Measurement
Roller shutters
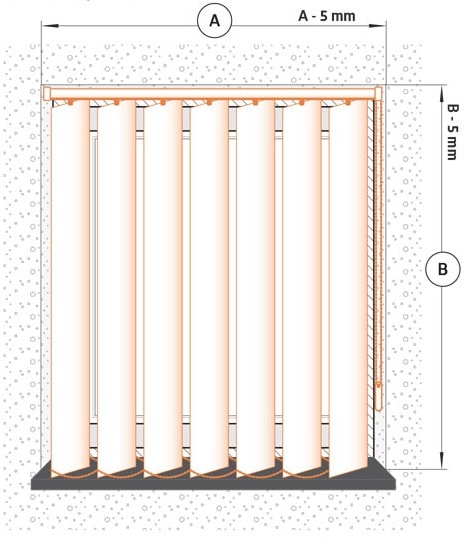
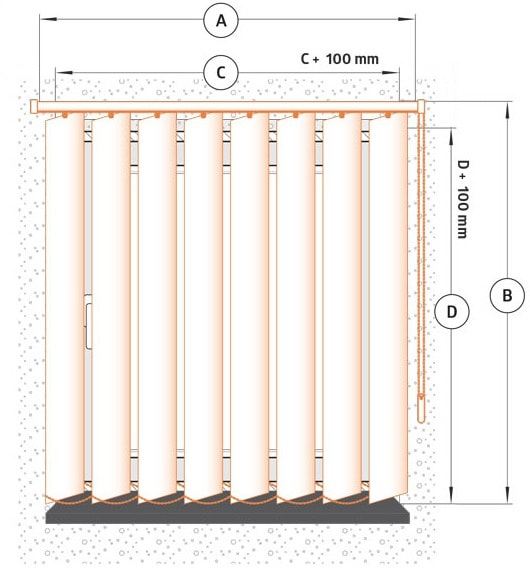
External roller shutter mounted on the wall
The roller shutter mounted on the facade with SK, SK + MKT straight guides is intended for building a window opening in external walls of buildings, used both in buildings under construction and in the already existing ones.
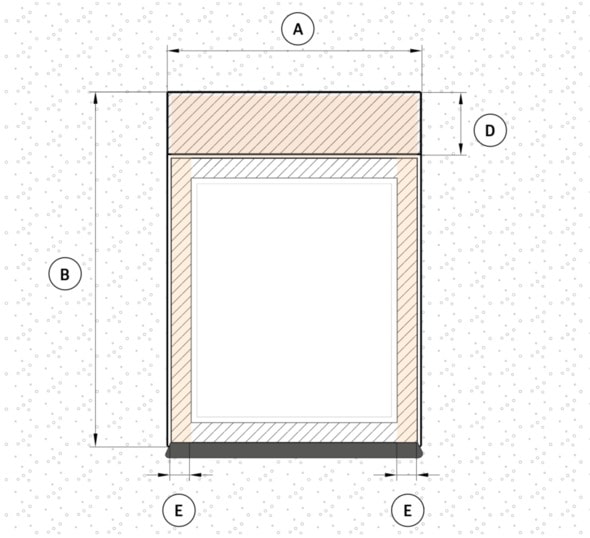
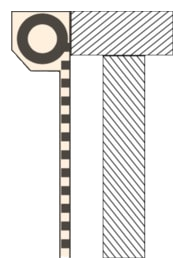
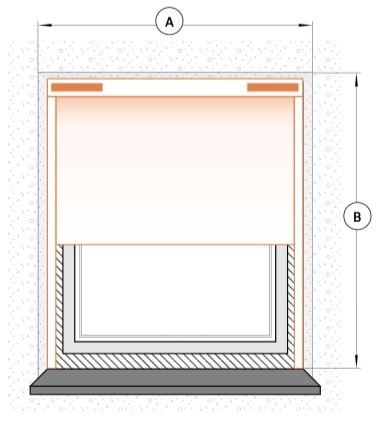
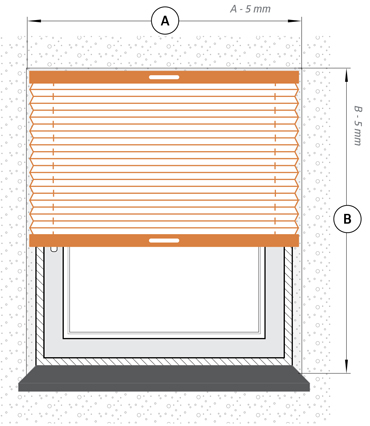
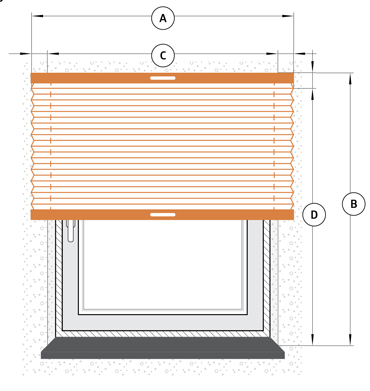
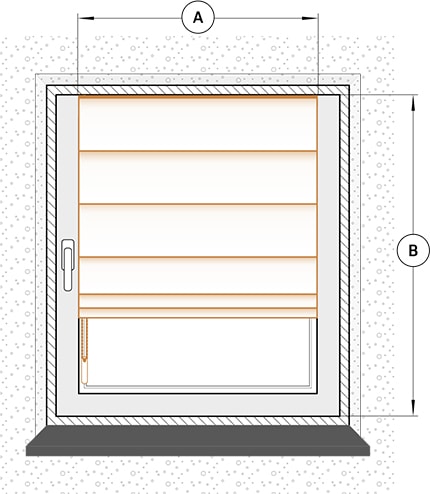
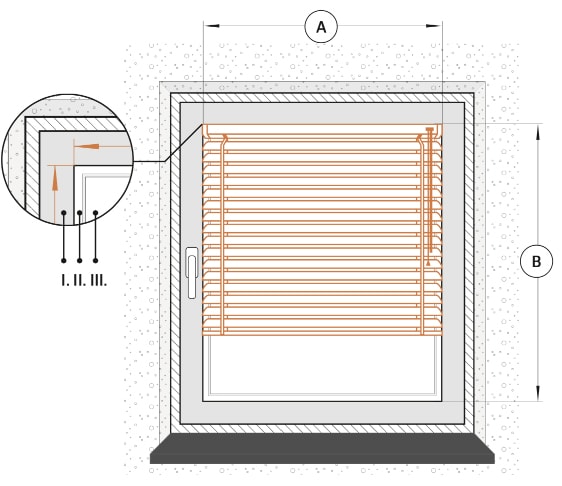
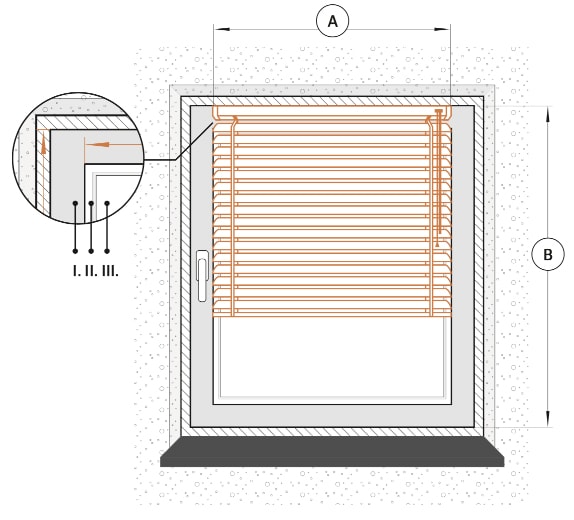
 1. Window recess seen from the front
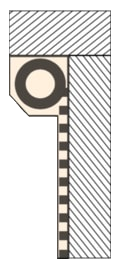
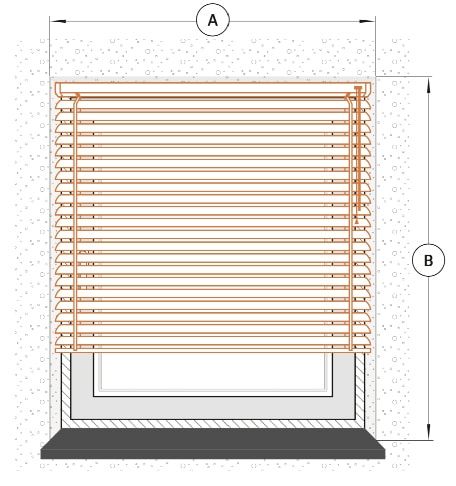
 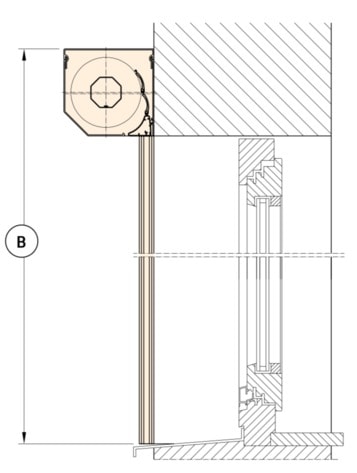 2. Window recess seen from the side
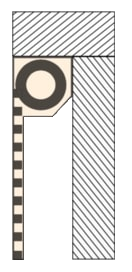
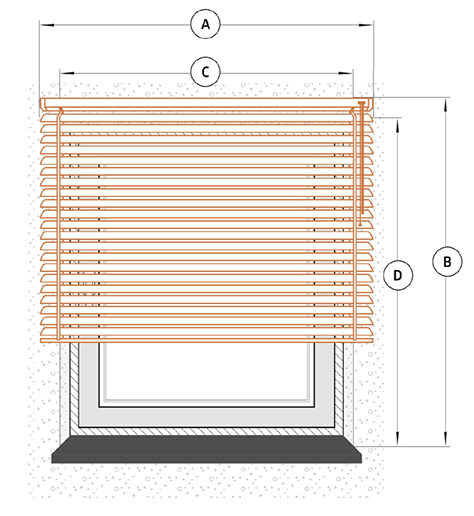
 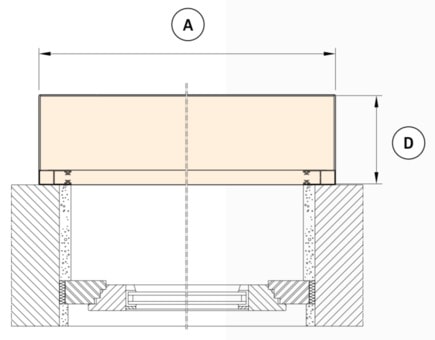 3. Window recess seen from above
- A - BOX WIDTH (This dimension should be entered in the "width" field in our configurator) It is the total width of the roller shutter together with the guides.
- B - SHUTTER HEIGHT (This dimension should be entered in the "height" field in our configurator) It is the total height of the roller shutter, the box together with the guides
- C - WINDOW RECESS WIDTH If the width of the recess is not the same at all points, the smallest recess dimension should be taken.
- D - BOX HEIGHT It is the height of the box without the guides, the height depends on the total size of the roller shutter, and its dimensions range from 139mm - 207mm.
- E - WINDOW RECESS HEIGHT If the height of the recess is not the same at all points, the smallest recess dimension should be taken.
- F - GUIDE WIDTH All models of guides have the same 53mm width.
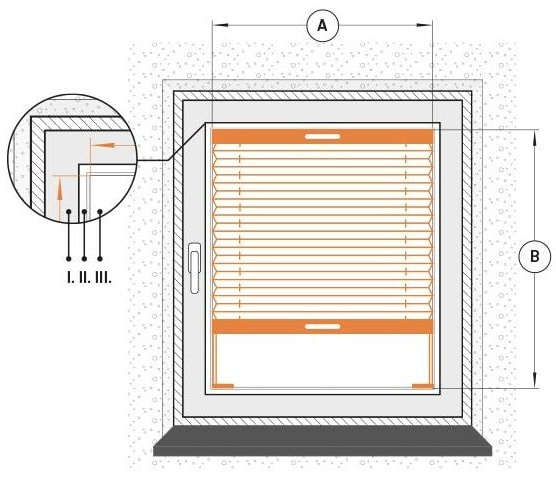
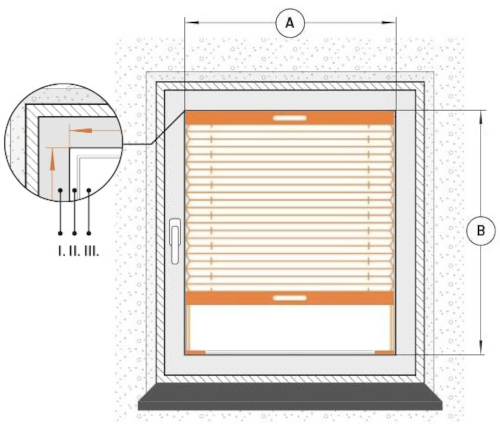
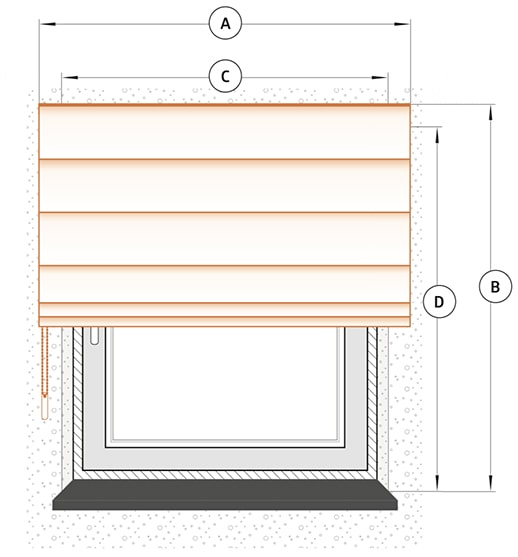
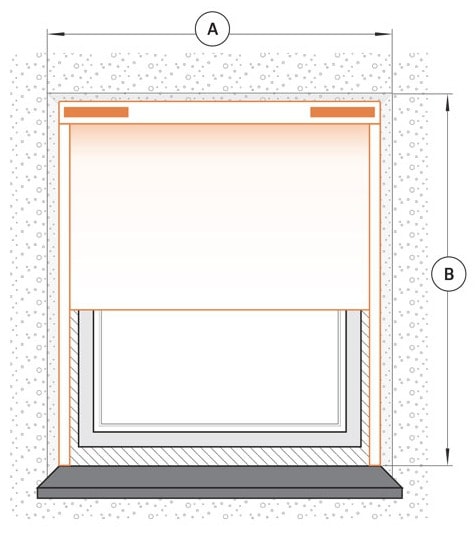
The external roller blind installed in the window recess
The blind is mounted in a window recess with angular or straight guides. SK, SK + MKT is intended for a window opening in window recesses in both buildings under construction and already existing ones.
 1. Window recess seen from the front
 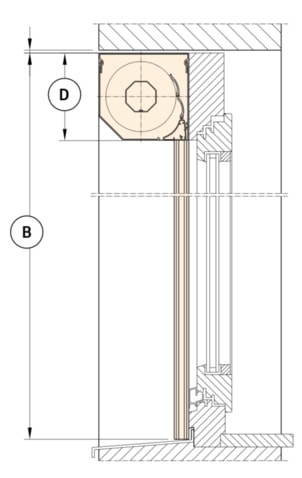 2. Window recess seen from the side
  3. Window recess seen from above
- A - WINDOW RECESS WIDTH (This dimension should be entered in the "width" field in our configurator, taking into account the distance Z) If the width of the recess is not the same at all points, the smallest recess dimension should be taken.
- B - WINDOW RECESS HEIGHT (This dimension should be entered in the "height" field in our configurator) If the height of the recess is not the same at all points, the smallest recess dimension should be taken.
- C - WINDOW RECESS DEPTH The depth of the window recess is the dimension that should be taken into account when selecting the size of the box, the dimensions of the boxes range from 139mm - 207mm see the table below "dimensions of boxes"
- D - BOX HEIGHT This is the height of the box without guides, the height depends on the total size of the roller shutter and its dimensions range from 139mm - 207mm, see the table below "box dimensions"
- E - GUIDE WIDTH All models of guides have the same 53mm width.
- Z - DISTANCE This is the distance that should be subtracted from the width of the window recess in order to freely install the blind. We subtract 2mm on each side for a total of 4mm from the width of the recess.
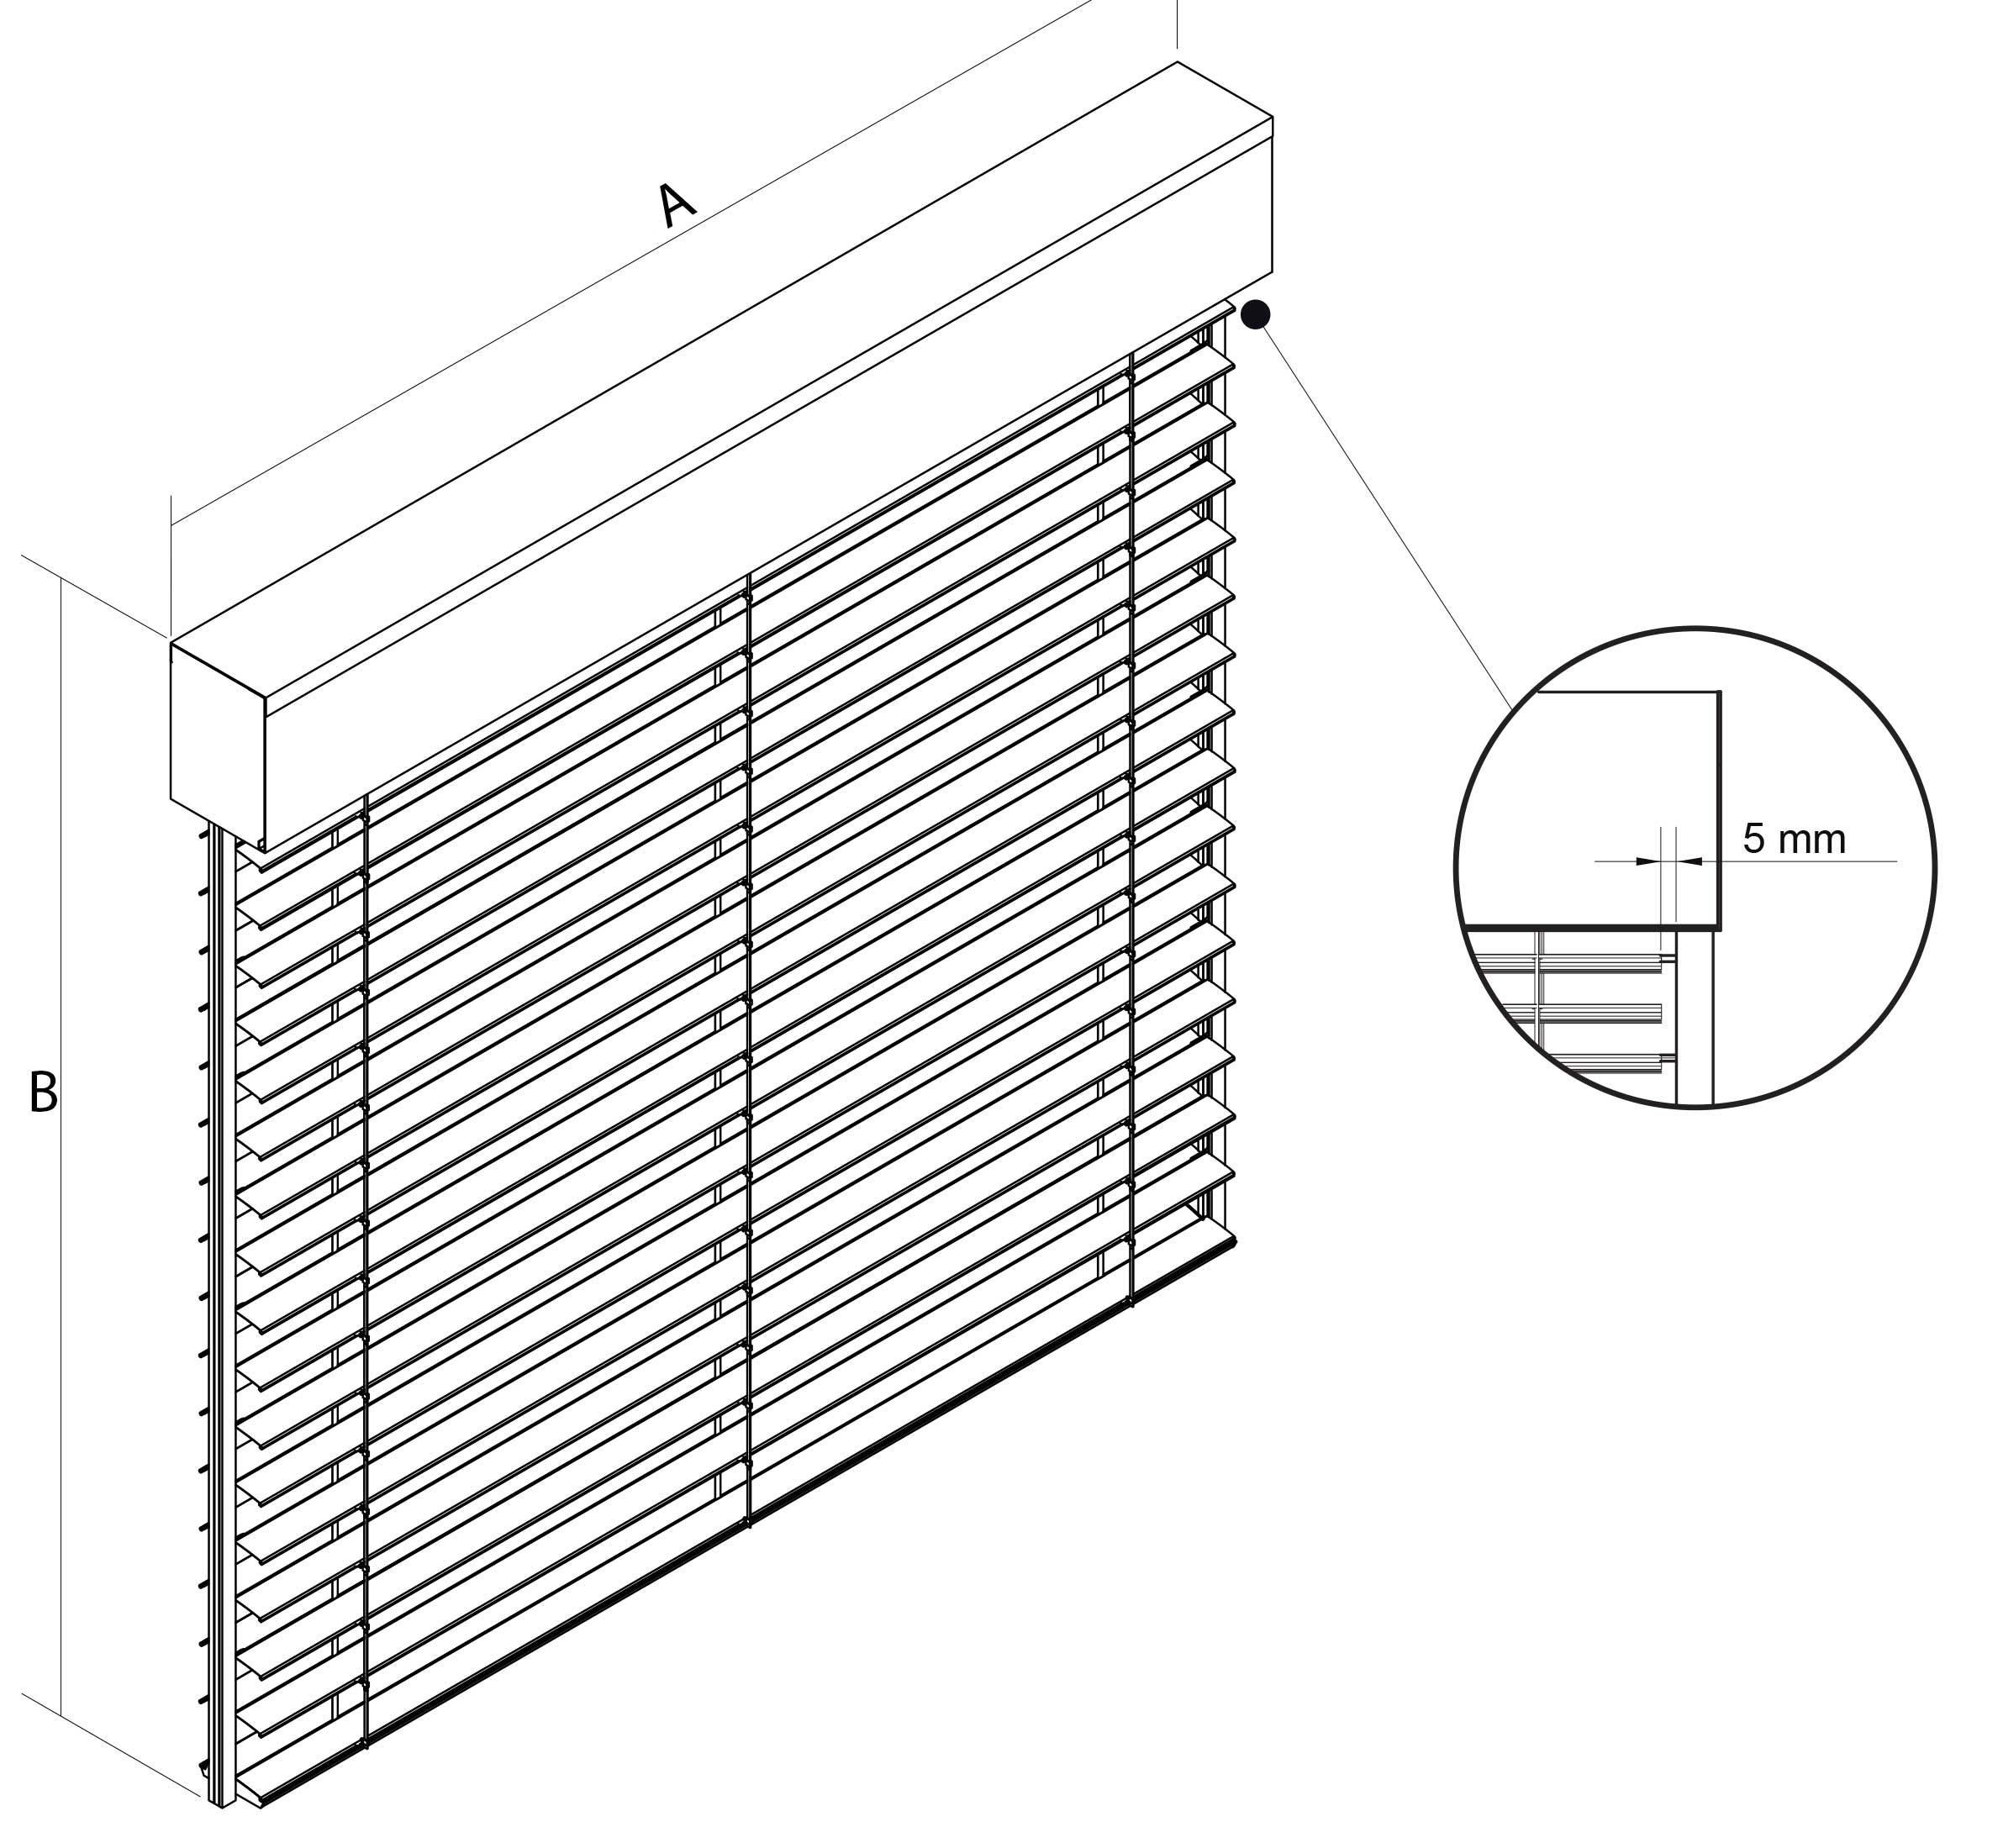
Type of external roller shutters
Dimensioning of the roller shutter depending on the method of installation
The roller-blind mounted on the facade, straight guides.
 shutter width: L = G + (2 x P)
 shutter height: H = W +S
The blind is mounted in the window recess with angular or straight guides.
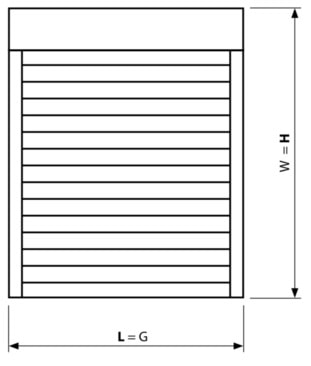 shutter width: L = G
 shutter height: H = W
If the width and height of the recess is not the same at all points, the smallest recess dimension should be taken or the opening should be appropriately corrected..
- L - TOTAL WIDTH OF THE SHUTTER
- G - WINDOW RECESS WIDTH
- P - GUIDE WIDTH (depending on the type of guides used - see types of guides)
- H - TOTAL HEIGHT OF SHUTTERS
- W - WINDOW RECESS HEIGHT
- S - SHUTTER BOX HEIGHT
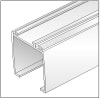
Boxes and side covers
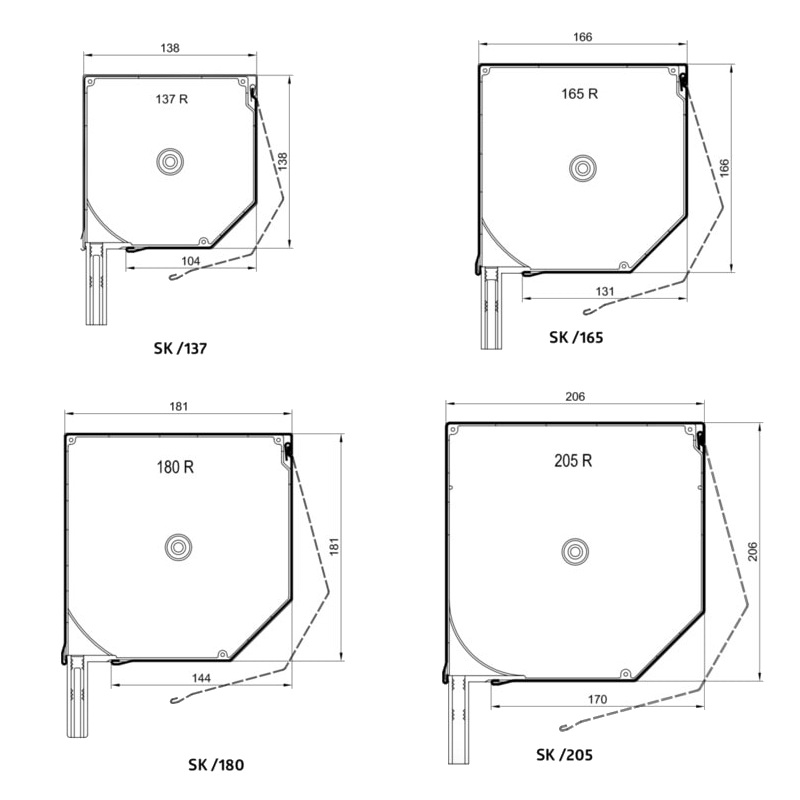
Maximum dimensions of boxes
| TOTAL SHUTTER HEIGHT FOR PROFILE PA39 | |||||
|---|---|---|---|---|---|
| Box type | The height of the box | The width of the box | Roller SK | Roller SK with a motor | Roller SK + MKT |
| 137 | 139mm | 137mm | to 1560mm | to 1440mm | - |
| 165 | 167mm | 165mm | to 2390mm | to 2280mm | to 1500mm |
| 180 | 183mm | 180mm | to 2950mm | to 2790mm | to 2300mm |
| 205 | 207mm | 205mm | to 4320mm | to 4050mm | to 2400mm |
*MKT - mosquito net
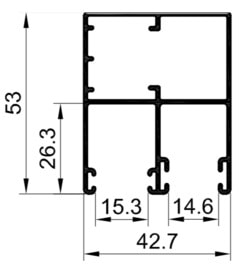
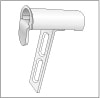
Guides and profile
STRAIGHT GUIDE
PP 53

ANGULAR GUIDE
PK 53

DOUBLE GUIDE
PPDO 53
STRAIGHT GUIDE
PP 68

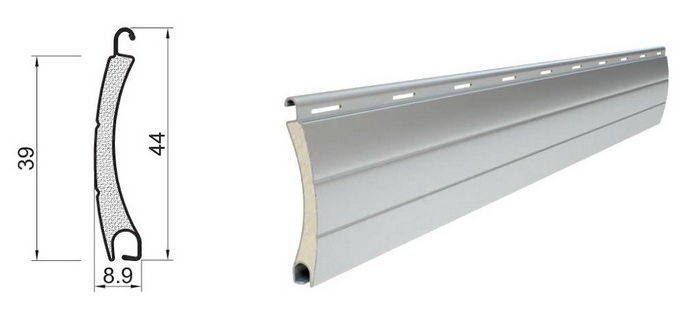
Profile PA39
*For larger sizes:
The PA39 profile will be replaced with the PA43 profile - this profile mainly differs in size and looks practically identical.
The PP 53 guide will be replaced with the PP 68 guide.
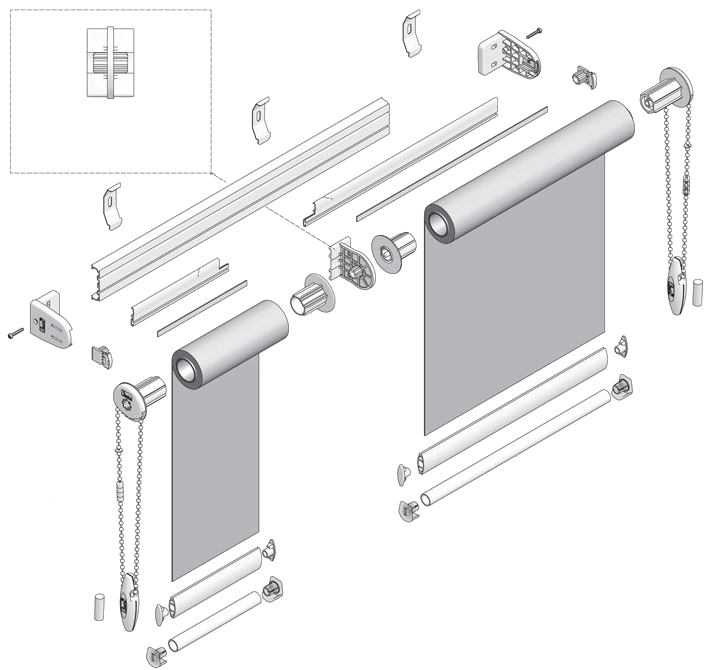
Components of external roller blinds
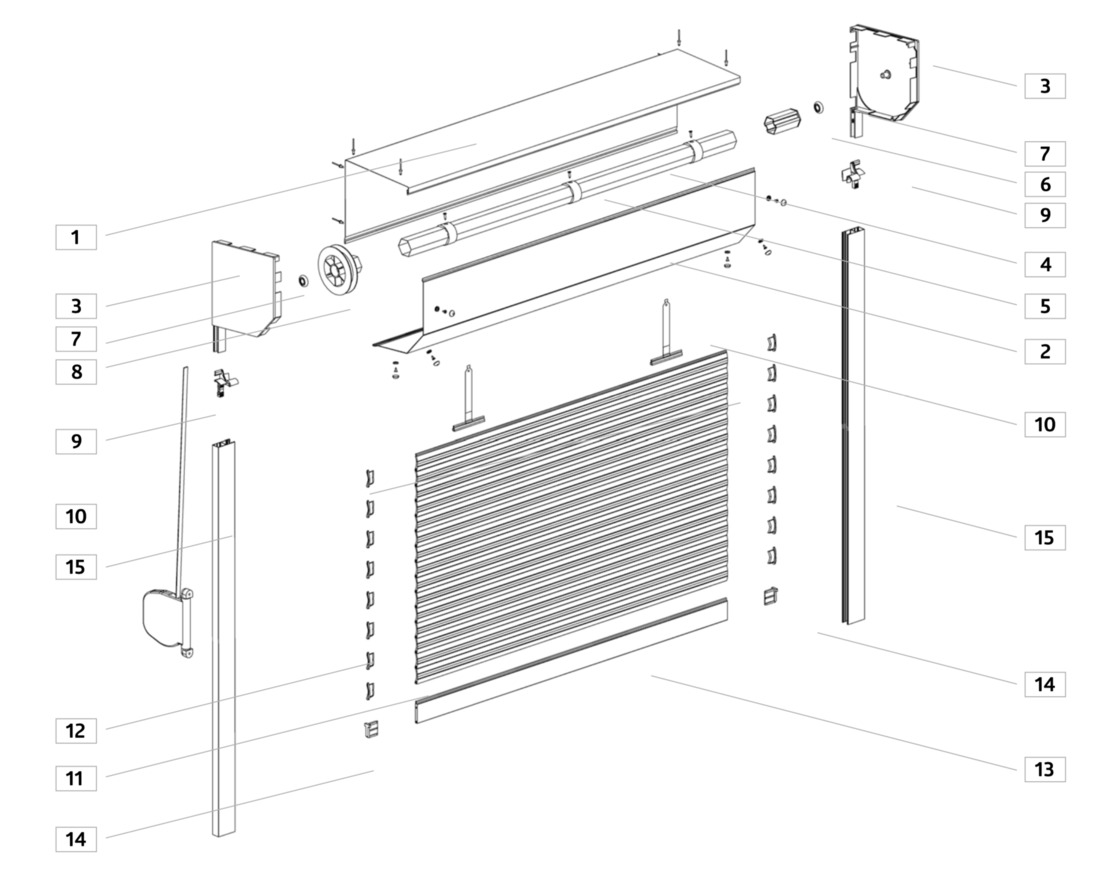
1. SK / 11 - ROLLER BOX TOP
2. SK / 21 - ROLLER BLIND BOX BOTTOM
3. BS 45 BOX SIDE COVER
4. OCTAGONAL PIPE
5. ADAPTING RING
6. HOLDER
7. BEARING
8. WINDING WHEEL
9. THE LAMELAE SLIDER IN THE GUIDE
10. HANGER
11. ROLLER BLIND CURTAIN OF ALUMINUM PROFILE
12. PROFILE PLUG
13. BOTTOM STRIP
14. BOTTOM STRIP PLUG
15. GUIDE
*All dimensions are given in millimeters
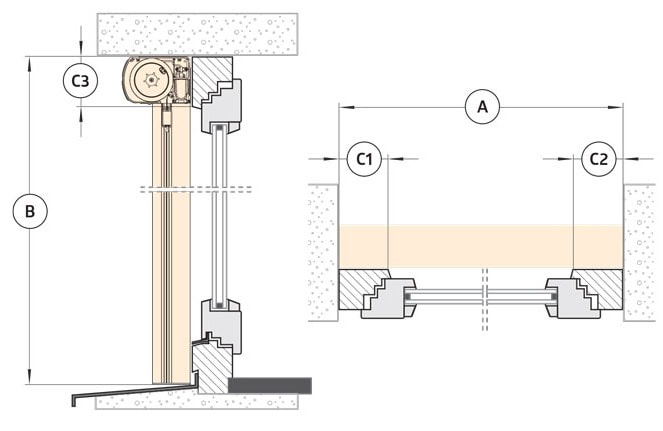
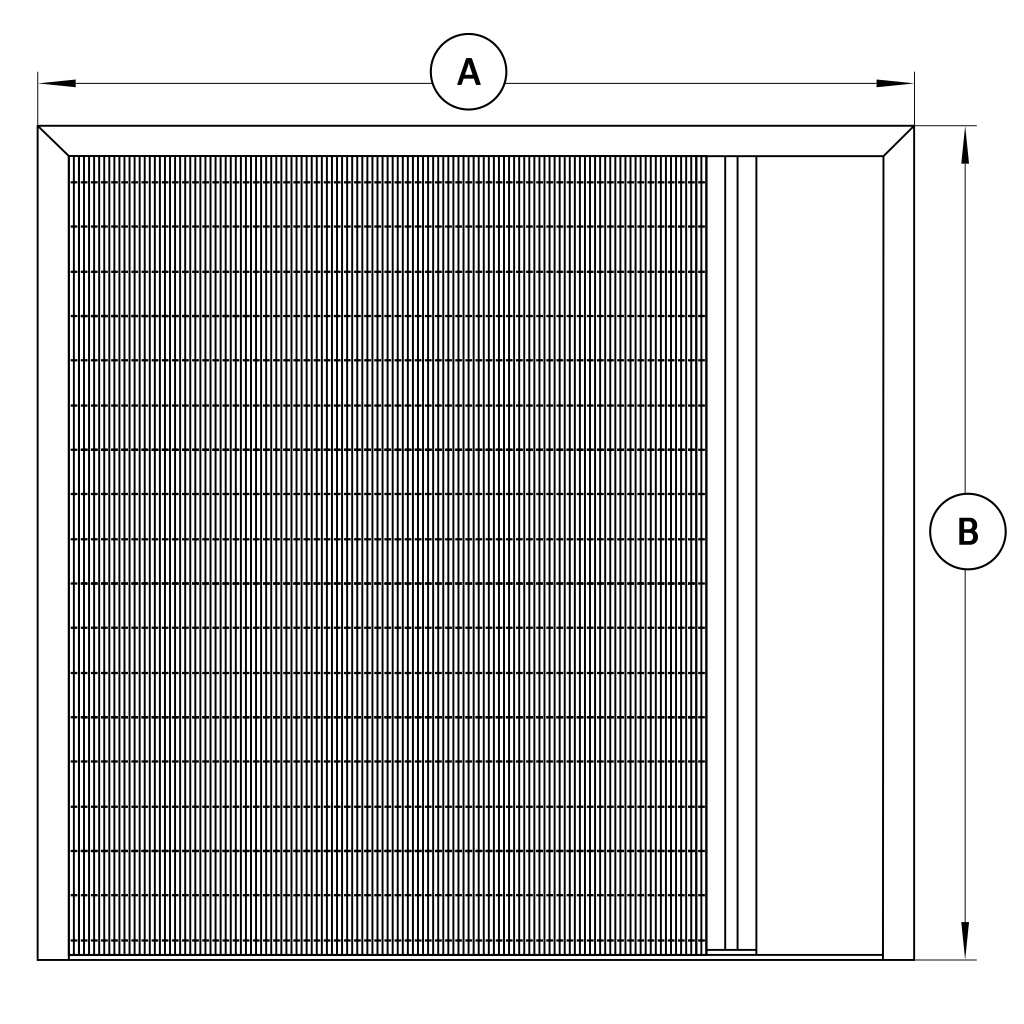
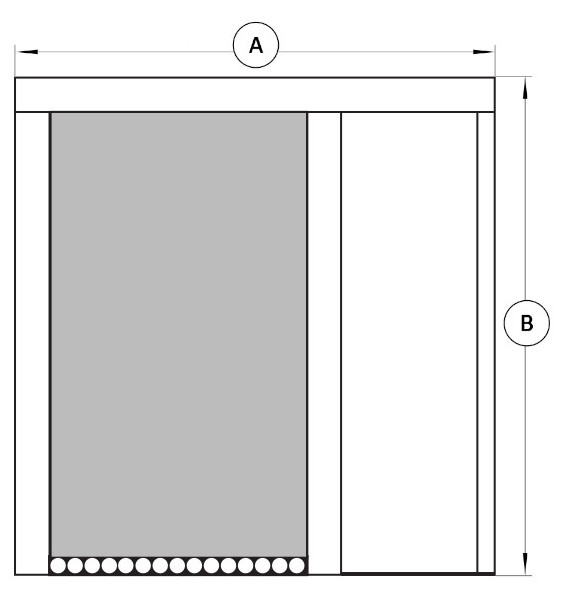
SCREEN external roller blinds
Measuring instructions external Screen roller blinds
Long and trouble-free operation of a blind depends not only on the high quality of its workmanship, but also on its correct fitting and assembly. For the blind to fit perfectly, the chosen location must be correctly and carefully dimensioned.
The following auxiliary drawings must be strictly adhered to.

- A - WIDTH This is the width of the window opening from the outside.
- B - HEIGHT This is the height of the window opening from the outside.
- C1, C2, C3 - Width of the visible elements of the window frame
Dimensions A and B will be the dimensions of the finished product.
*C1 and C2 are the width of the visible window frame elements (if C1<25 mm or c2<25 assembly impossible)
Technical data
| Maximum dimensions supported by boxes | ||
|---|---|---|
| Box type | Max width | Max height |
| 95 | 3000mm | 3000mm |
| 105 | 3500mm* | 4000mm* |
| 125 | 5000mm* | 5000mm* |
*We cannot produce screen blinds, where both dimension exceed 3000mm. Only one can be above 3m, in example: you can order a 5000x3000, but cannot order 5000x3100, the same goes for 3100x5000.
| Performance features of the system | |
|---|---|
| System dimensions [mm] | System properties |
| Height of the box: 95/105/125 | Wind resistance [km/h]: 145 |
| Surface area [m2]: 9/12/15 | Solar radiation reduction: 75% |
| UV rays filtering: 8% | |
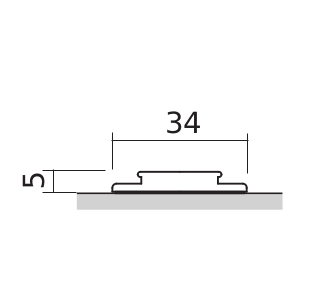
HEMA - Box 95


Bottom rail

HEMA - Box 105


Bottom rail
HEMA - Box 125


Bottom rail
*All dimensions are given in millimeters.
Roller blinds MGS, MGII, MAXI
Measuring instructions Roller blind MG, MGS
Long and trouble-free operation of the window shutter depends not only on the high quality of its workmanship, but also on its correct fitting and assembly. For the diaphragm to fit perfectly, the chosen location must be correctly and carefully dimensioned.
The following auxilary drawings must be strictly adhered to.
Bolted - window recess
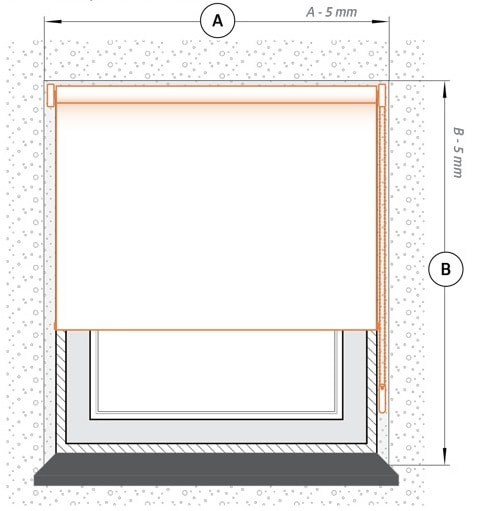
- A - WINDOW RECESS WIDTH If the width of the recess at all points is not the same, the smallest dimension of the recess should be taken. 5mm is the distance to be subtracted from the width of the window recess for free installation of the roller blind.
- B - WINDOW RECESS HEIGHT If the height of the recess at all points is not the same, the smallest dimension of the recess should be taken. 5mm is the distance to be subtracted from the height of the window recess for free installation of the roller blind.
Bolted - wall or ceiling
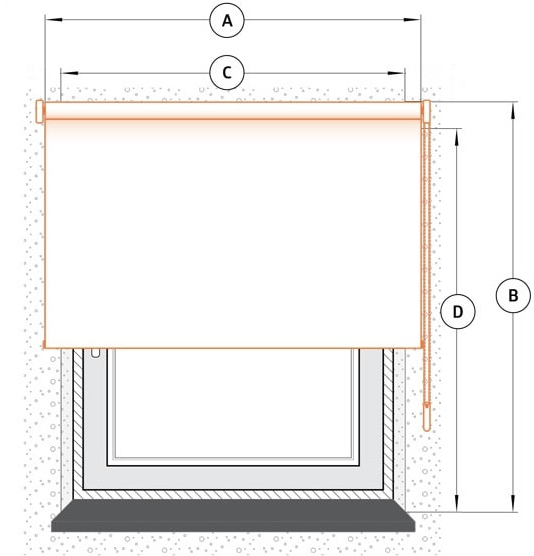
- A - BLIND FABRIC WIDTH
- B - BLIND HEIGHT
- C - WINDOW RECESS WIDTH
- D - HEIGHT OF THE WINDOW RECESS
Use this option if you want to install the blind on the wall. We suggest that the blind be about 8-10 cm wider and 8-10 cm higher than the window recess, so that there are no gaps.
*The upper mechanism of the blind takes about 8 cm in height
Additional informations and comments
Thanks to the integrated protective collar, the blind aesthetically resembles cassette models. It additionally ensures lateral guidance of the material. For custom orders, it is possible to use a bearing rail connector, which allows for the assembly of several blinds closely together, with minimal gaps between the fabrics.
To order a blind with this connector, please describe this in the "comments" field to let us know and discuss the details.
*All dimensions are given in millimeters
Dimensional algorithm
• Pipe – dimension A +4 mm
• Fabric – dimension A
• Weight beam – dimension A
• Support profile MG S
– dimension A +15 mm
• Cover profile MG S
– dimension A +15 mm
• Attachment profile MG S
– dimension A +15 mm
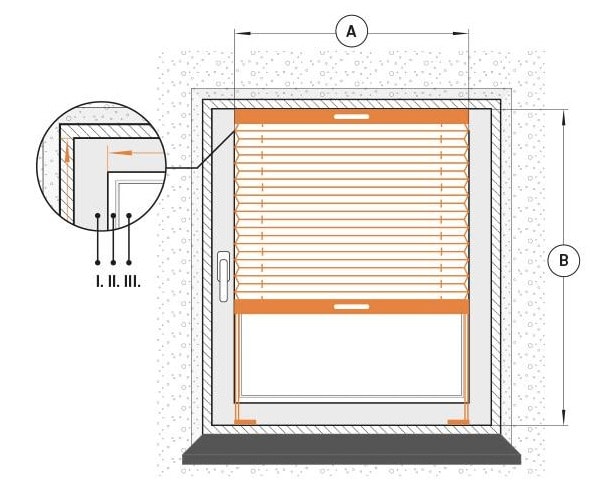
Pleated Blinds
Pleated Blinds Measuring Instructions
The long and trouble-free operation of the window cover depends not only on the high quality of its manufacture, but also on its proper fitting and assembly. For the aperture to fit perfectly, the chosen location must be correctly and carefully dimensioned.
The following auxiliary drawings must be strictly adhered to.
Installation Inside the Window Recess
- A - WINDOW RECESS WIDTH If the width of the recess is not the same at all points, use the smallest measurement. 5 mm is the distance that must be subtracted from the recess width to allow the pleated blind to be installed freely.
- B - WINDOW RECESS HEIGHT If the height of the recess is not the same at all points, use the smallest measurement. 5 mm is the distance that must be subtracted from the recess height to allow the pleated blind to be installed freely.
Installation inside the window recess applies to the following types of pleated blinds: 1SCOW, 2SCOW.
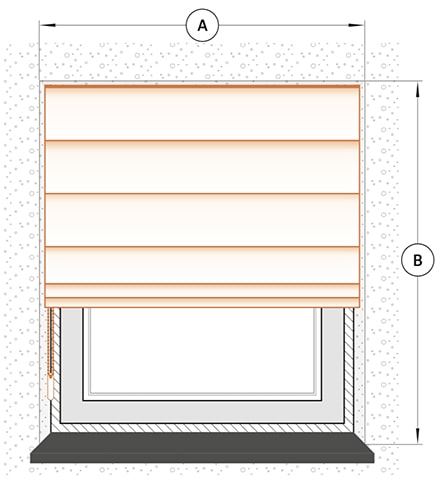
Wall / Ceiling Mounting
- A - PLEATED BLIND WIDTH
- B - PLEATED BLIND HEIGHT
- C - WINDOW RECESS WIDTH
- D - WINDOW RECESS HEIGHT
Use this option if you want to install the pleated blinds on the wall. We suggest that the pleated blind be about 8-10 cm wider and 8-10 cm higher than the window recess to avoid gaps.
Wall / Ceiling mounting applies to the following types of pleated blinds: 1SCOW, 2SCOW.
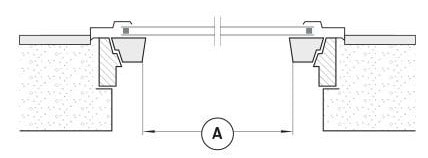
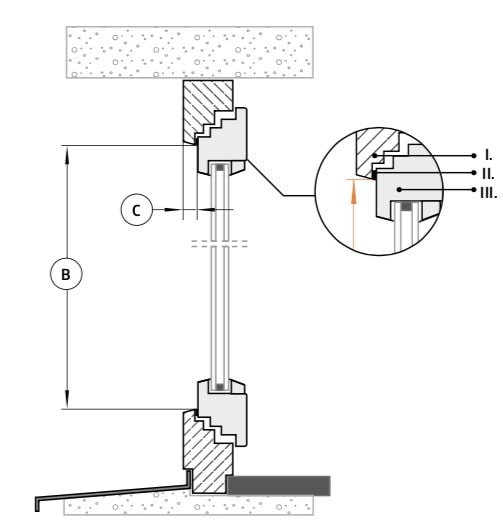
Mounting Between Glazing Beads
- A - WIDTH This is the width of the visible area of the glass.
- B - HEIGHT This is the height of the visible area of the glass.
- I - Window Frame
- II - Glazing Bead
- III - Glass
*The pleated blind operates within the glass pane area, between the glazing beads. (When measuring, do so without the seals; measure only the glass!) This will allow the pleated blind to operate correctly and smoothly.
Mounting between glazing beads applies to the following types of pleated blinds: 2SCK.
Mounting On Glazing Beads
- A - WIDTH This is the width of the glass including the glazing beads.
- B - HEIGHT This is the height of the glass including the glazing beads.
- I - Window Frame
- II - Glazing Bead
- III - Glass
*When measuring, ensure that the pleated blind does not interfere with the window handle.
Mounting on glazing beads applies to the following types of pleated blinds: 2SCK.
Non-Invasive Mounting on the Window Sash
- A - WIDTH This is the width of the glass including the glazing beads.
- B - HEIGHT This is the height of the window sash.
- I - Window Frame
- II - Glazing Bead
- III - Glass
*When measuring, ensure that the pleated blind does not interfere with the window handle.
Non-invasive mounting on the window sash applies to the following types of pleated blinds: 2SCK, 1SCOW, 2SCOW.
Pleated Blinds Installation on Roof Windows

 Roof Window - Top View
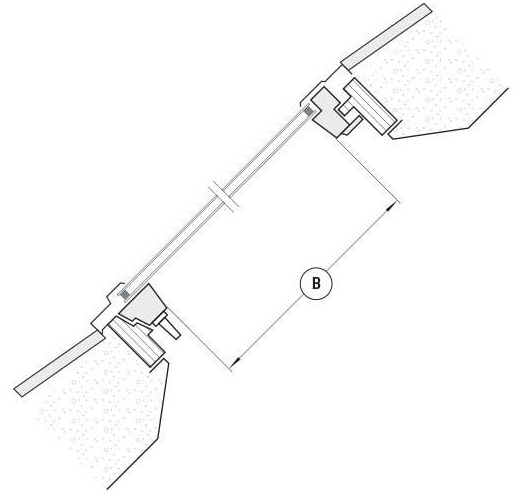 Roof Window - Side View
- A - WIDTH This is the width from edge to edge of the glazing bead.
- B - HEIGHT This is the height from edge to edge of the glazing bead.
- I - Window Frame
- II - Glass
Only COSIMO SL roof pleated blinds can be installed on roof windows.
*All dimensions are given in millimetres.
Roman Blinds
Measurement instruction
Roman blinds
The long and trouble-free operation of the window shutter depends not only on the high quality of its performance but also on its correct fit and assembly. In order for the iris to fit perfectly, the chosen place must be correctly and carefully dimensioned.
The following drawings in the auxiliary must be strictly observed.
Installation in the window recess
- A - WIDTH OF WINDOW RECESS If the width of the gap in all points is not equal, then the smallest dimension of the gap should be the same.5mm is the distance that should be taken away from the width of the window recessfor free installation on the blind.
- B - HEIGHT OF THE WINDOW RECESS If the height of the cavity in all points is not equal, then the smallest dimension of the cavity should be the same.5mm is the distance that should be taken away from the height of the window recessfor free installation on the blind.
Mounting on the window frame - non-invasive option
- A - WIDTH It is the width of the glass with glazing beads
- B - HEIGHT This is the height from the top to the bottom of the frame.
Wall/ceiling mounting
- A - WIDTH ROLLER This is the total width of the blinds. It should be remembered that the blind was wider than the window recess, min. 5-8 cm so that there is no light after leaving it.
- B - HEIGHT ROLLER This is the total height of the blinds. When rolled up, the Roman blind reaches a height of 22 to 35 cm, depending on its length.
- C - WIDTH OF WINDOW RECESS
- D - WINDOW RECESS HEIGHT
Available models
Roman blinds available in the Knall online store are available in two types. These are very similar systems, which differ mainly in aesthetics.
Model 2

Roller blind with circular underwires* (4 mm).
With transparent horizontal tape. Package min. 23 cm.
Model 3

Roller blind with circular underwires* (3 mm).
With pleats on the back of the fabric. Package min. 21 cm.
Accessories
Non-invasive upper bracket for PVC windows
Open track with detachable cords

Universal bracket
Non-invasive lower bracket for string installation
Track cross-section
Ceiling bracket
*All dimensions are in millimeters
*When rolled up, the blind reaches a height of 22 to 35 cm, depending on the length of the blind.
Internal Venetian Blinds
Venetian blinds
measuring instructions
The long and trouble-free operation of the window cover depends not only on the high quality of its manufacture, but also on its proper fitting and assembly. For the aperture to fit perfectly, the chosen location must be correctly and carefully dimensioned.
The following auxiliary drawings must be strictly adhered to.
Installation in between the glazing beads

- A - WIDTH This is the width of the "light" of the glass (not including the gasket).
- B - HEIGHT This is the height of the "light" of the glass (not including the gasket).
- I - WINDOW FRAME
- II - GLAZING BEAD
- III - GLASS
Mounting on glazing beads
- A - WIDTH It is the width of the glass together with the glazing beads.
- B - HEIGHT It is the height of the glass together with the glazing beads.
- I - WINDOW FRAME
- II - GLAZING BEAD
- III - GLASS
Non-invasive installation on the window sash
- A - WIDTH It is the width of the glass together with the glazing beads.
- B - HEIGHT This is the height of the window sash
- I - WINDOW FRAME
- II - GLAZING BEAD
- III - GLASS
Installation inside the window recess
- A - WINDOW RECESS WIDTH If the recess width is not the same at all points, the smallest recess dimension should be taken. 5mm is the distance that should be subtracted from the width of the window recess for easy installation of blinds.
- B - WINDOW RECESS HEIGHT If the recess height is not the same at all points, the smallest recess dimension should be taken. 5mm is the distance that should be subtracted from the height of the window recess for easy installation of blinds.
*Remember that when the blinds are rolled up, the height of the mechanism will increase by the thickness of the slat pack, which in some cases may interfere with the opening of the window.
*The heights of the lamella packages can be found in the descriptions of the blinds.
Wall mounting
- A - BLIND WIDTH
- B - BLIND HEIGHT
- C - WINDOW RECESS WIDTH
- D - WINDOW RECESS HEIGHT
Use this option if you want to install the blinds on the wall. We suggest that the shutter is about 8-10cm wider and 8-10cm higher than the window recess, so that there are no gaps.
*All dimensions are given in millimeters
**There may be slight differences in the height of the blinds. The tolerance of differences is from -5 mm to +35 mm.
External Venetian blinds
Measurement manual Venetian blinds
The long and trouble-free operation of the window cover depends not only on the high quality of its manufacture, but also on its proper fitting and assembly. For the aperture to fit perfectly, the chosen location must be correctly and carefully dimensioned.
The following auxiliary drawings must be strictly adhered to.
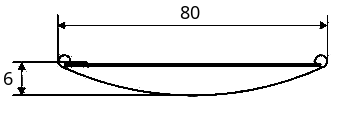
- A - The total width of the venetian blind
- B - The total height of the venetian blind
Height B should be given with the box, box dimensions should be selected according to the table below:
| Żaluzje Z90 | Żaluzje C80 | |||
|---|---|---|---|---|
| Cassette height [cm] | Guide height [cm] | System height [cm] | Guide height [cm] | System height [cm] |
| 22 | 40 50 60 70 80 90 100 110 120 130 140 150 160 |
62 72 82 92 102 112 122 132 142 152 162 172 182 |
40 50 60 70 80 |
62 72 82 92 102 |
| 27 | 165 175 185 195 205 215 |
192 202 212 222 232 242 |
90 95 105 115 125 135 145 155 |
112 122 132 142 152 162 172 182 |
| 31 | 221 231 241 251 261 271 |
252 262 272 282 292 302 |
165 171 181 191 201 211 |
192 202 212 222 232 242 |
| 35 | 277 287 297 307 317 |
312 322 332 342 352 |
221 227 237 247 257 267 |
252 262 272 282 292 302 |
Vertical Blinds
Measuring instructions Vertical blinds
The long and trouble-free operation of the window cover depends not only on the high quality of its manufacture, but also on its proper fitting and assembly. For the aperture to fit perfectly, the selected location must be correctly and carefully dimensioned.
The following auxiliary drawings must be strictly adhered to.
Bolted - window recess
- A - WINDOW RECESS WIDTH If the recess width is not the same at all points, the smallest recess dimension should be taken. 5mm is the distance that should be subtracted from the width of the window recess in order to freely install the blinds.
- B - WINDOW RECESS HEIGHT If the recess height is not the same at all points, the smallest recess dimension should be taken. 5mm is the distance that should be subtracted from the height of the window recess in order to freely install the blinds.
Bolted - wall or ceiling
- A - SYSTEM WIDTH
- B - SYSTEM HEIGHT
- C - WINDOW RECESS WIDTH 100mm is the suggested distance that should be added to the width of the window recess to prevent gaps.
- D - WINDOW RECESS HEIGHT 100mm is the suggested distance that should be added to the width of the window recess to prevent gaps.
*All dimensions are given in millimeters.
Vertical Awnings
Vertical awnings Fakro VMZ/VMB measuring instructions
The long and trouble-free operation of the window cover depends not only on the high quality of its manufacture, but also on its proper fitting and assembly. For the aperture to fit perfectly, the chosen location must be correctly and carefully dimensioned.
The following auxiliary drawings must be strictly adhered to.
We take the measurement on the outside of the window
- A - WIDTH This is the width of the outer window recess.
- B - HEIGHT This is the height of the outer window recess.
- C1, C2, C3 - WIDTH OF VISIBLE FRAME ELEMENTS
*C1 and C2 are the width of the visible frame elements in the side part (C1<25mm, or C2<25mm - MONTAGE IMPOSSIBLE!)
*All dimensions are given in millimeters
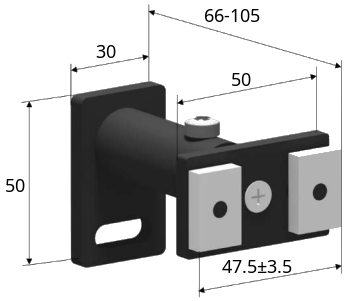
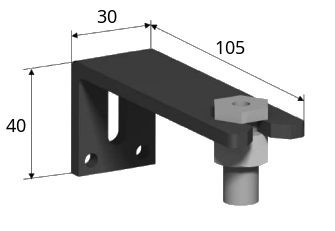
Patio Awnings
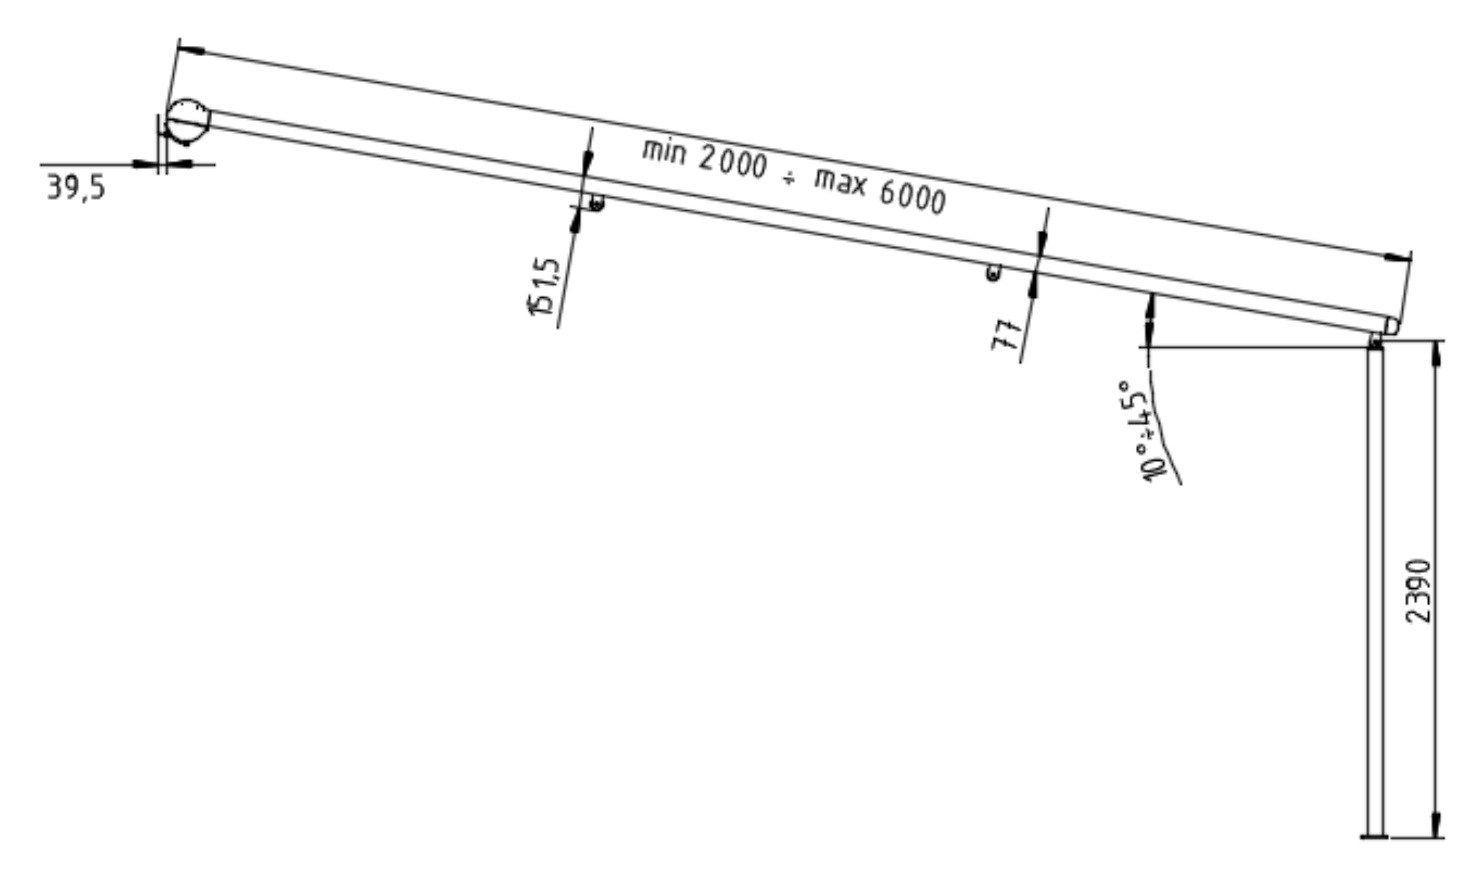
Measuring instruction Patio awnings
Long and failure-free operation of the awning depends not only on the high quality of its workmanship but also on its correct adjustment and installation. For the awning to fit perfectly, the selected location must be correctly and carefully sized.
The following auxilary drawings must be strictly adhered to.
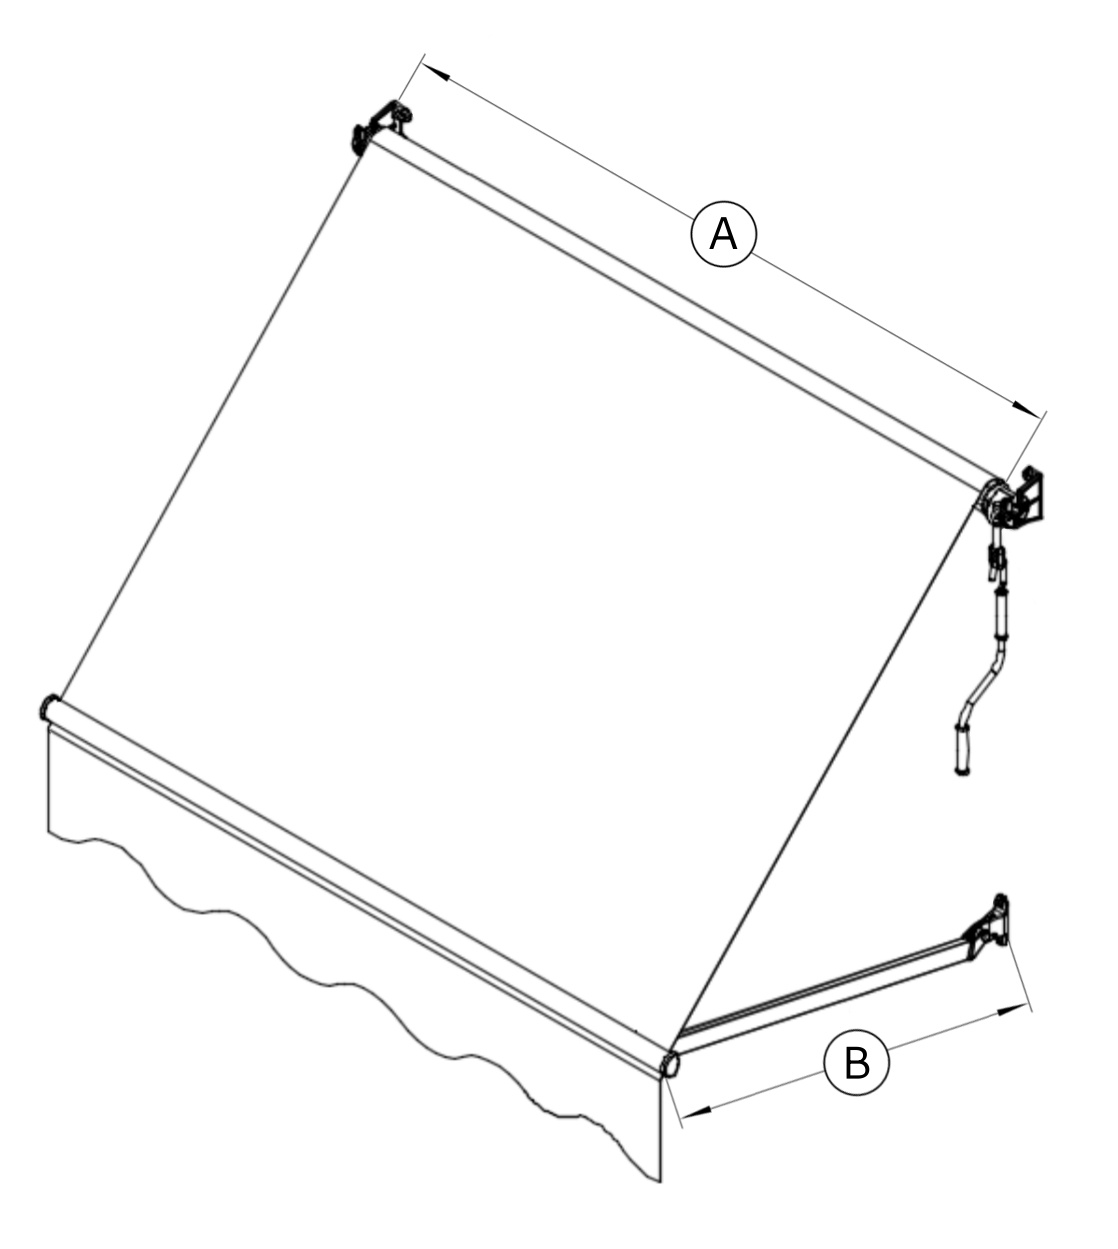
Montage by screwing
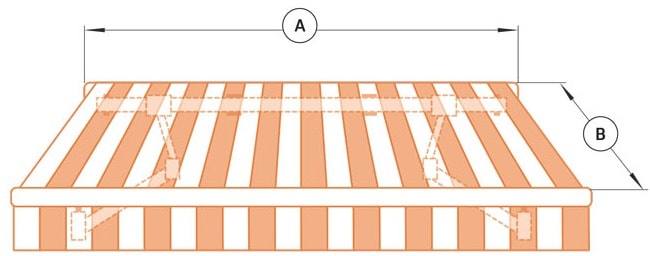 Patio awning - front view
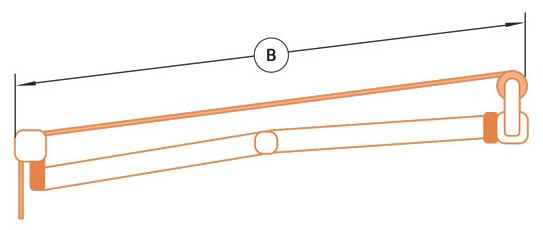 Patio awning - side view
- A - WIDTH OF THE AWNING
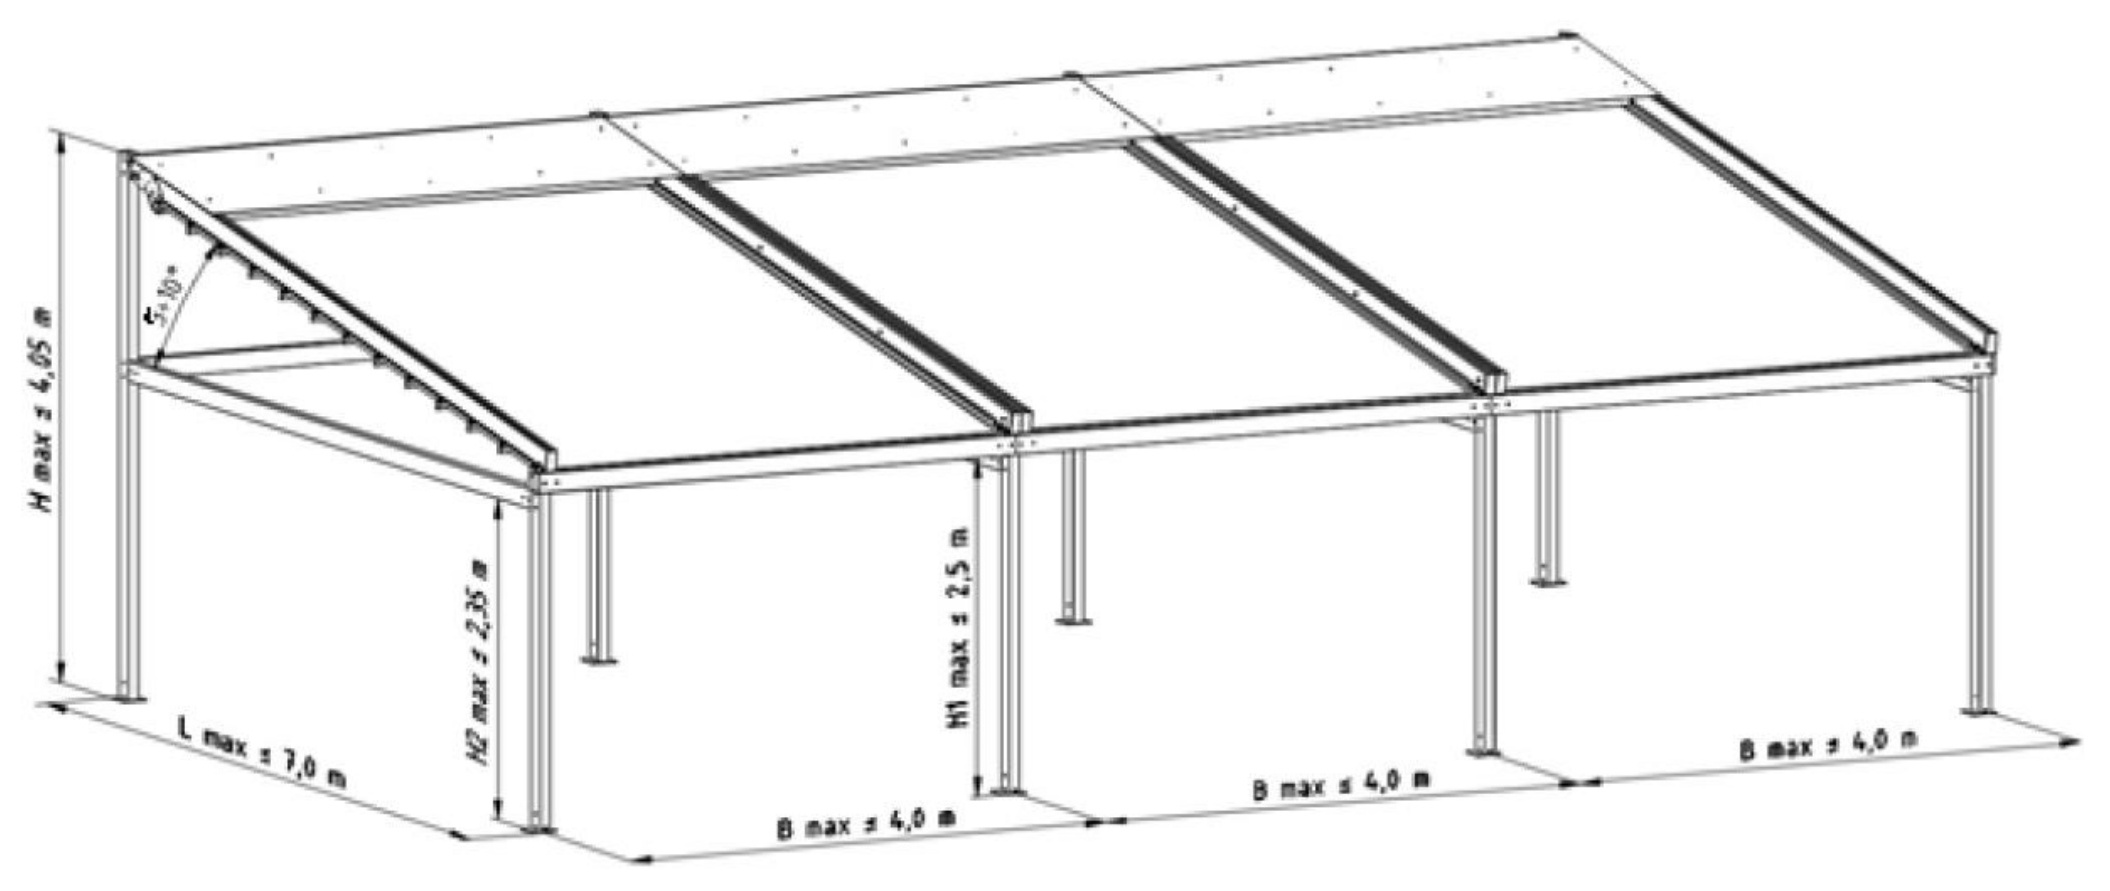
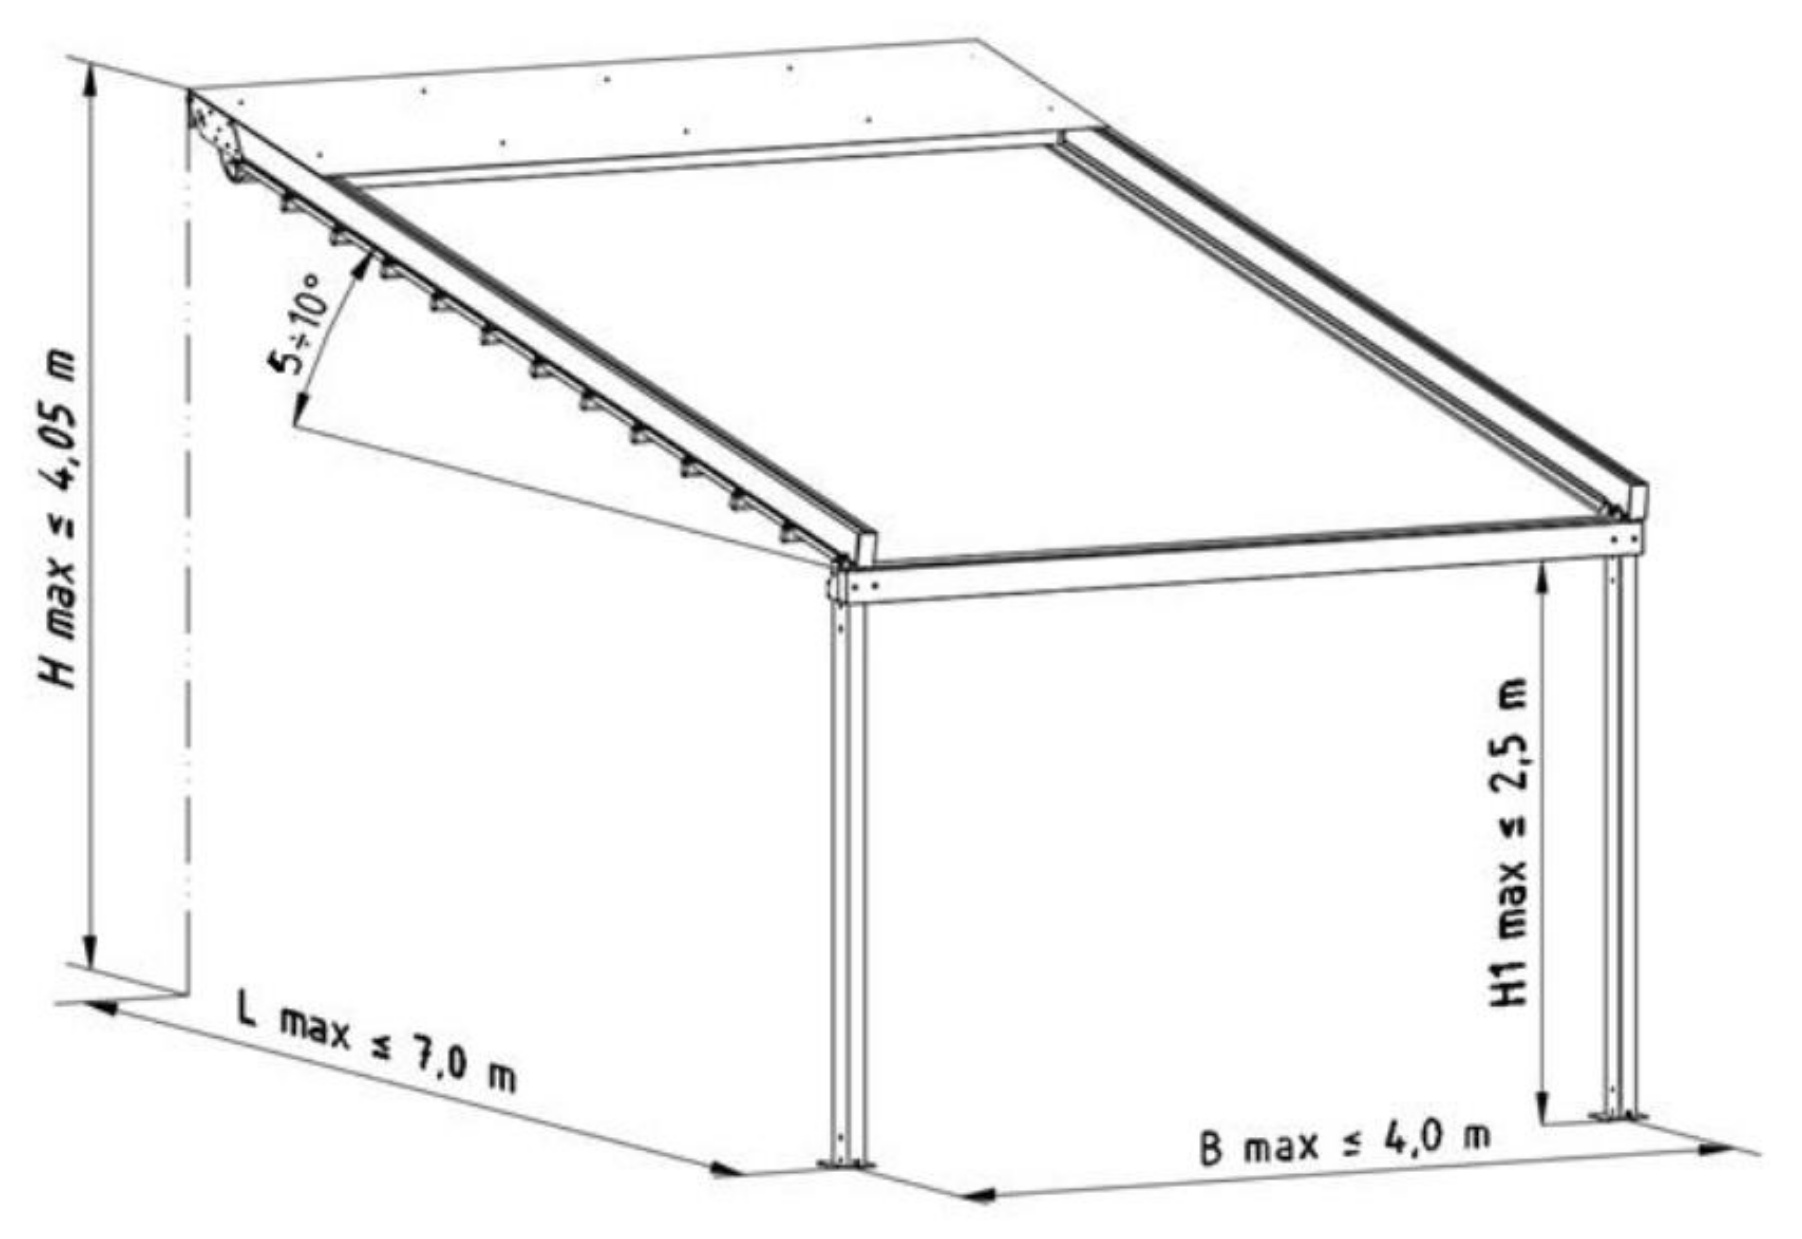
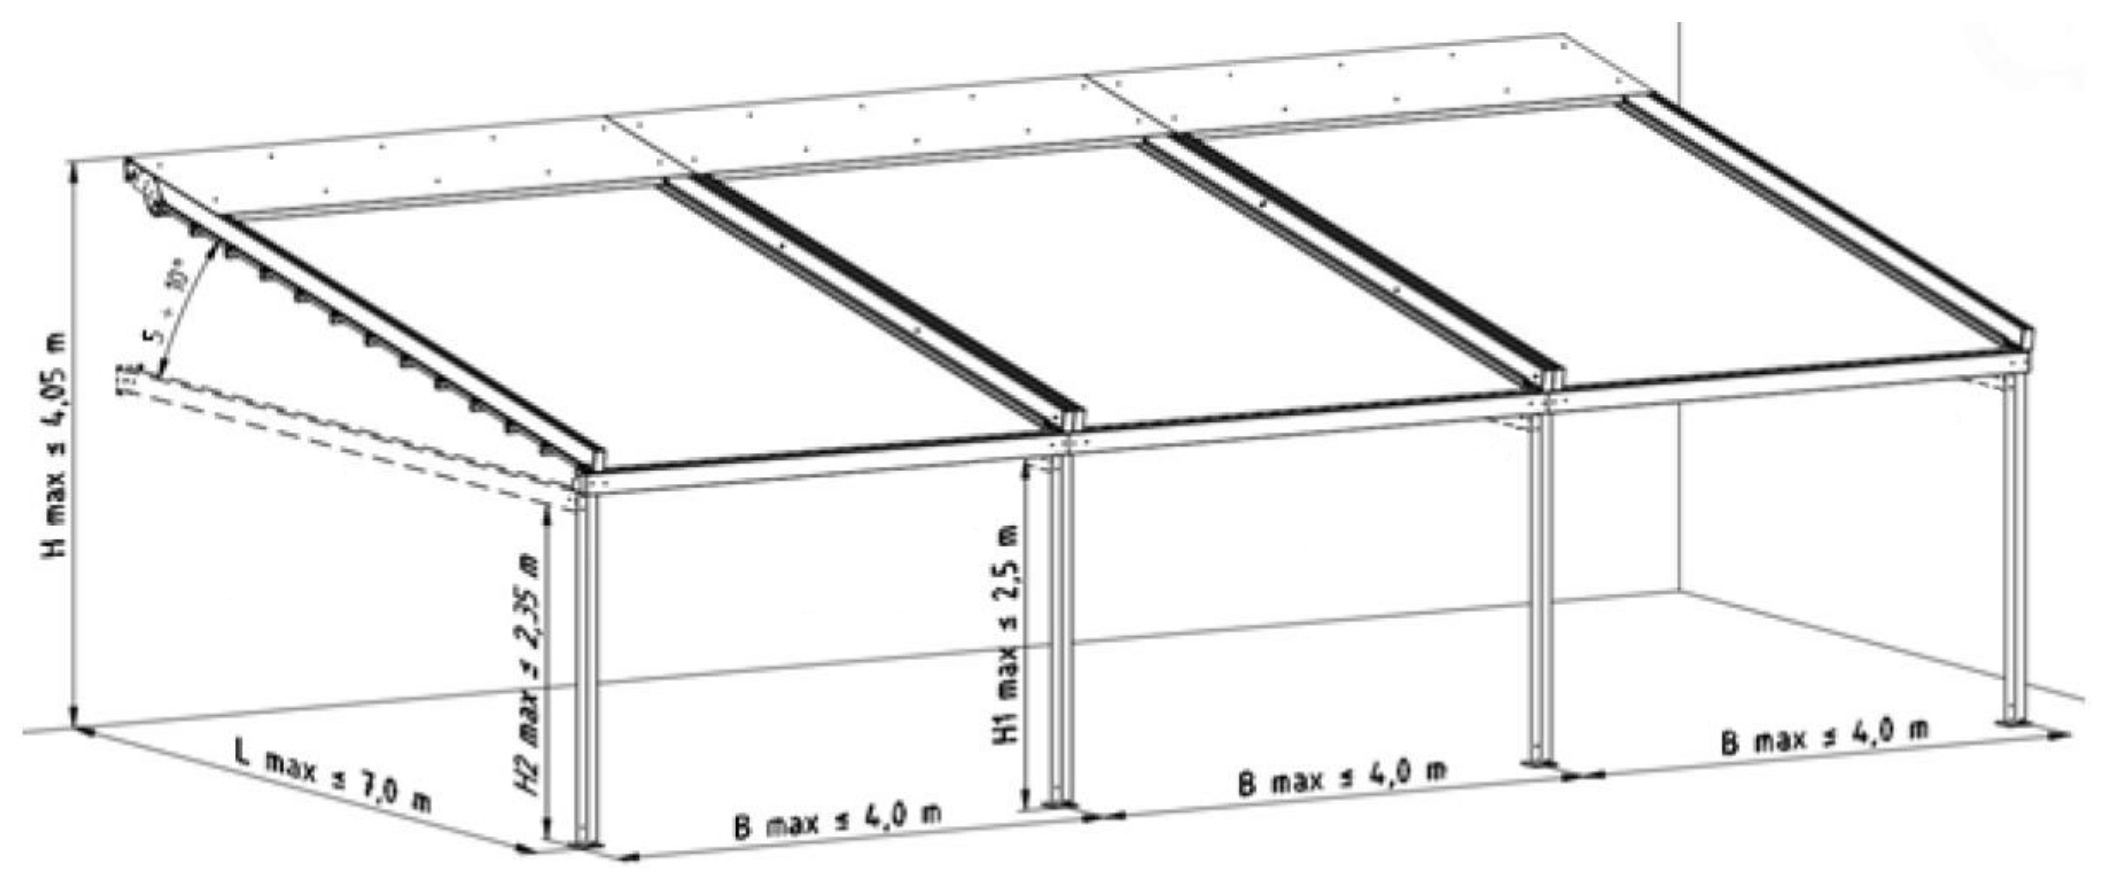
- B - AWNING REACH The reach of the awning depends on its angle of inclination. The awning reach is the distance from the building wall to the tension beam, with an inclination angle of approximately 4 degrees. In most cases, the angle of inclination is larger (the recommended angle of inclination for proper drainage of rain is 14 degrees).
Dimensions of patio awning systems
Terrace awning systems available in our online store have dimensions in millimeters shown in the auxiliary drawings below:
Patio awning Corsica Premium in a cassette

Patio awning Palladio Premium in a cassette

Patio awning Jamaica Premium without a cassette

Patio awning Silver Plus Classic without a cassette

*All dimensions are given in millimeters
Winter garden awnings
Measuring Instructions for Veranda Awning
The long and trouble-free operation of the sunshade depends not only on the high quality of its construction but also on its proper fitting and installation. To ensure the awning fits perfectly, the chosen location must be properly and carefully measured.
It is imperative to follow the below-mentioned illustrative diagrams.
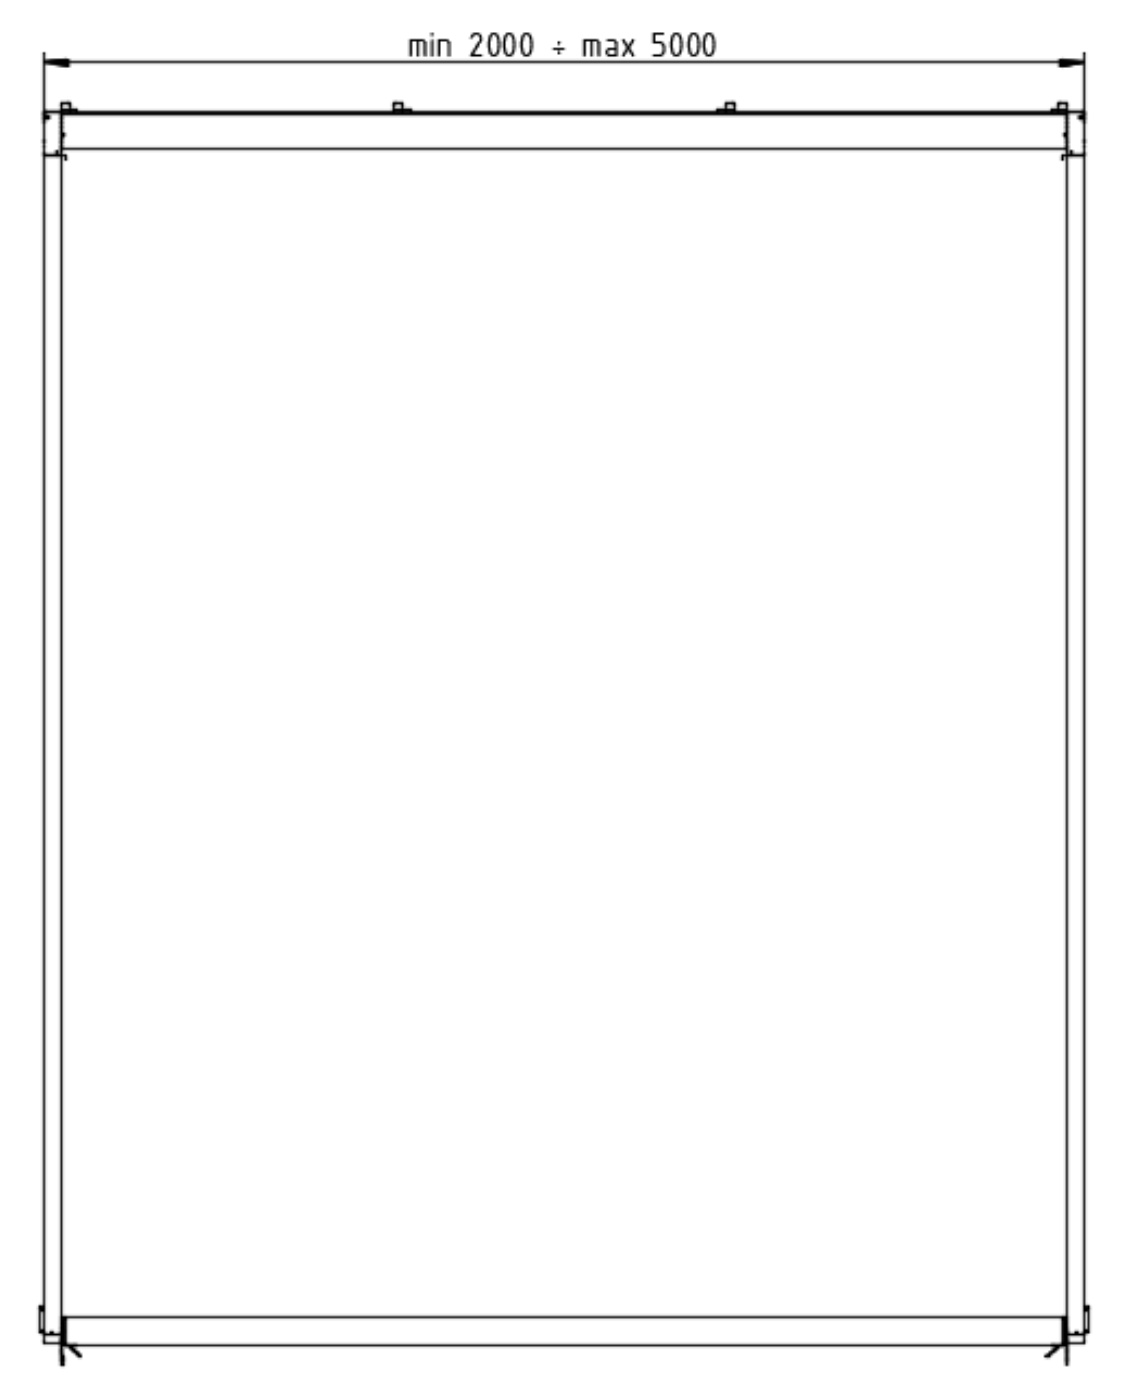
- A - WIDTH This is the width of the awning.
- B - HEIGHT This is the height of the awning.
*When planning the installation of multiple Veranda awning modules side by side, we encourage you to familiarize yourself with the technical documentation available on our website, and to contact our customer service department before making a purchase.

Standard is L1
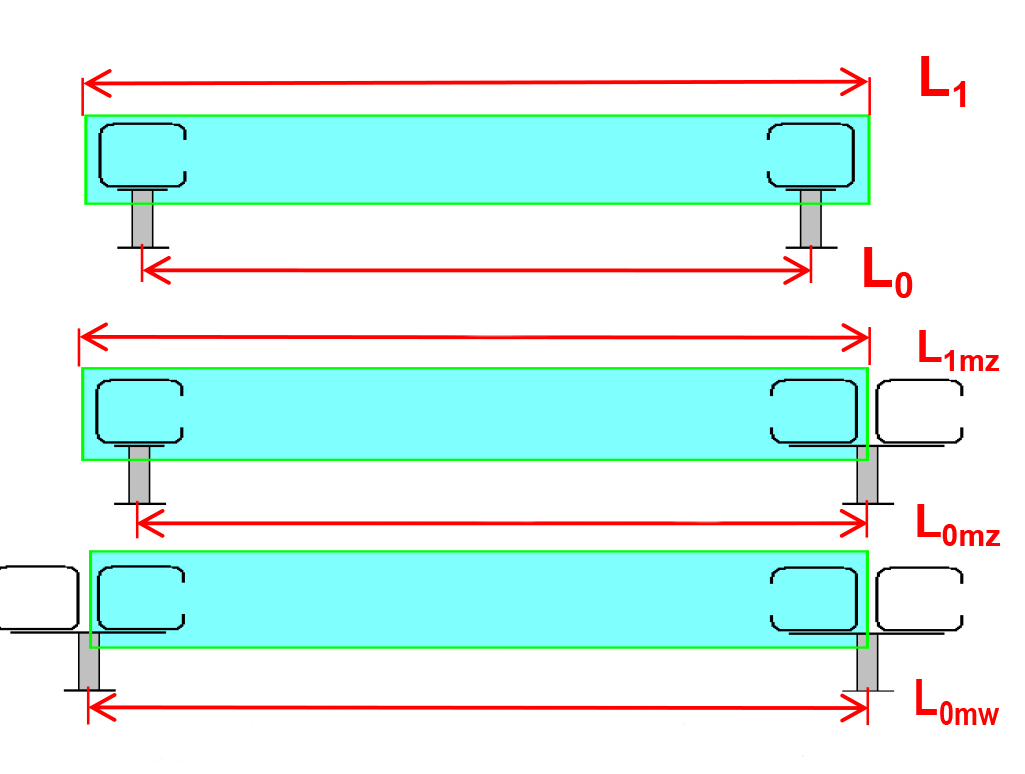
*All dimensions are given in millimeters.
Balcony awnings
Measuring Instructions for Italia Balcony Awning
The long and fault-free operation of the sunshade depends not only on its high-quality, but also on its proper fitting and installation. To ensure the shade fits perfectly, the chosen location must be correctly and carefully measured.
It is imperative to follow the below-mentioned illustrative diagrams.
- A - WIDTH This is the width of the awning.
- B - EXTENSION This is the reach of the awning arm.
When installing a manual awning inside a balcony recess, we recommend leaving a gap of 15 cm from the wall on the control side. This will ensure ease of installation and operation.


*All dimensions are given in millimeters.
Side awnings
Measuring Instructions for Bahama Awning
The long and trouble-free operation of the sunshade depends not only on the high quality of its construction but also on its proper fitting and installation. To ensure the awning fits perfectly, the chosen location must be properly and carefully measured.
It is absolutely essential to follow the below auxiliary drawings.
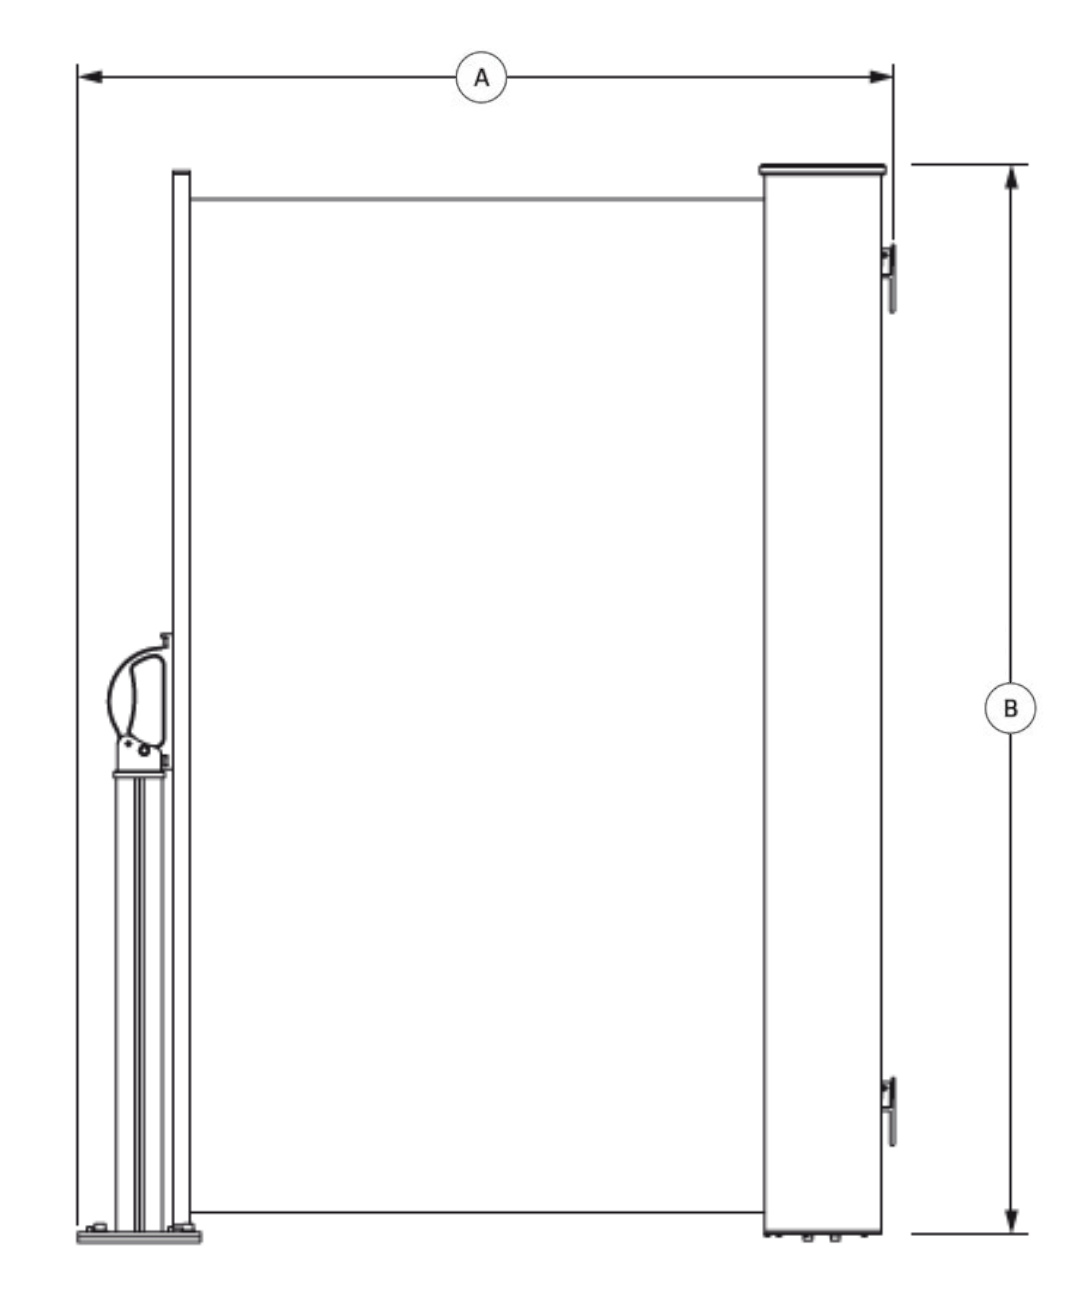
- A - WIDTH This is the width of the awning.
- B - HEIGHT This is the height of the awning.
*The dimensions provided during configuration refer to the total width and height of the awning system, including mounting elements. It's important to remember that the actual length of the awning fabric may be slightly smaller and will depend on the chosen method of installation.
The awning comes in three variants, depending on the method of Assembly.
Variant 1

Designed for installation on hardened surfaces.
The mounting element has a diameter of 145mm.
Variant 2
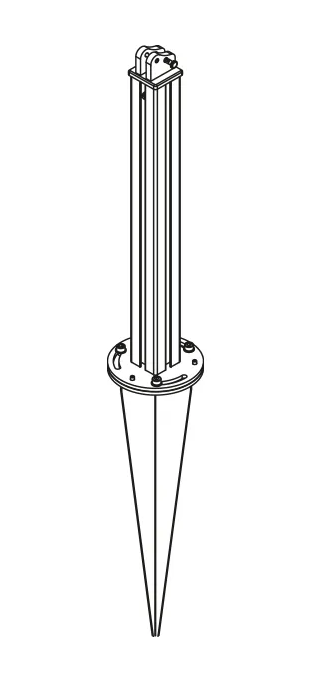
For installation on soft ground, e.g. on the lawn.
The mounting element has a diameter of 145mm.
Variant 3

Designed for wall mounting.
The width of the bracket is 64mm.
*All dimensions are given in millimeters.
Pergolas
Pergola Installation
Pergola SB350
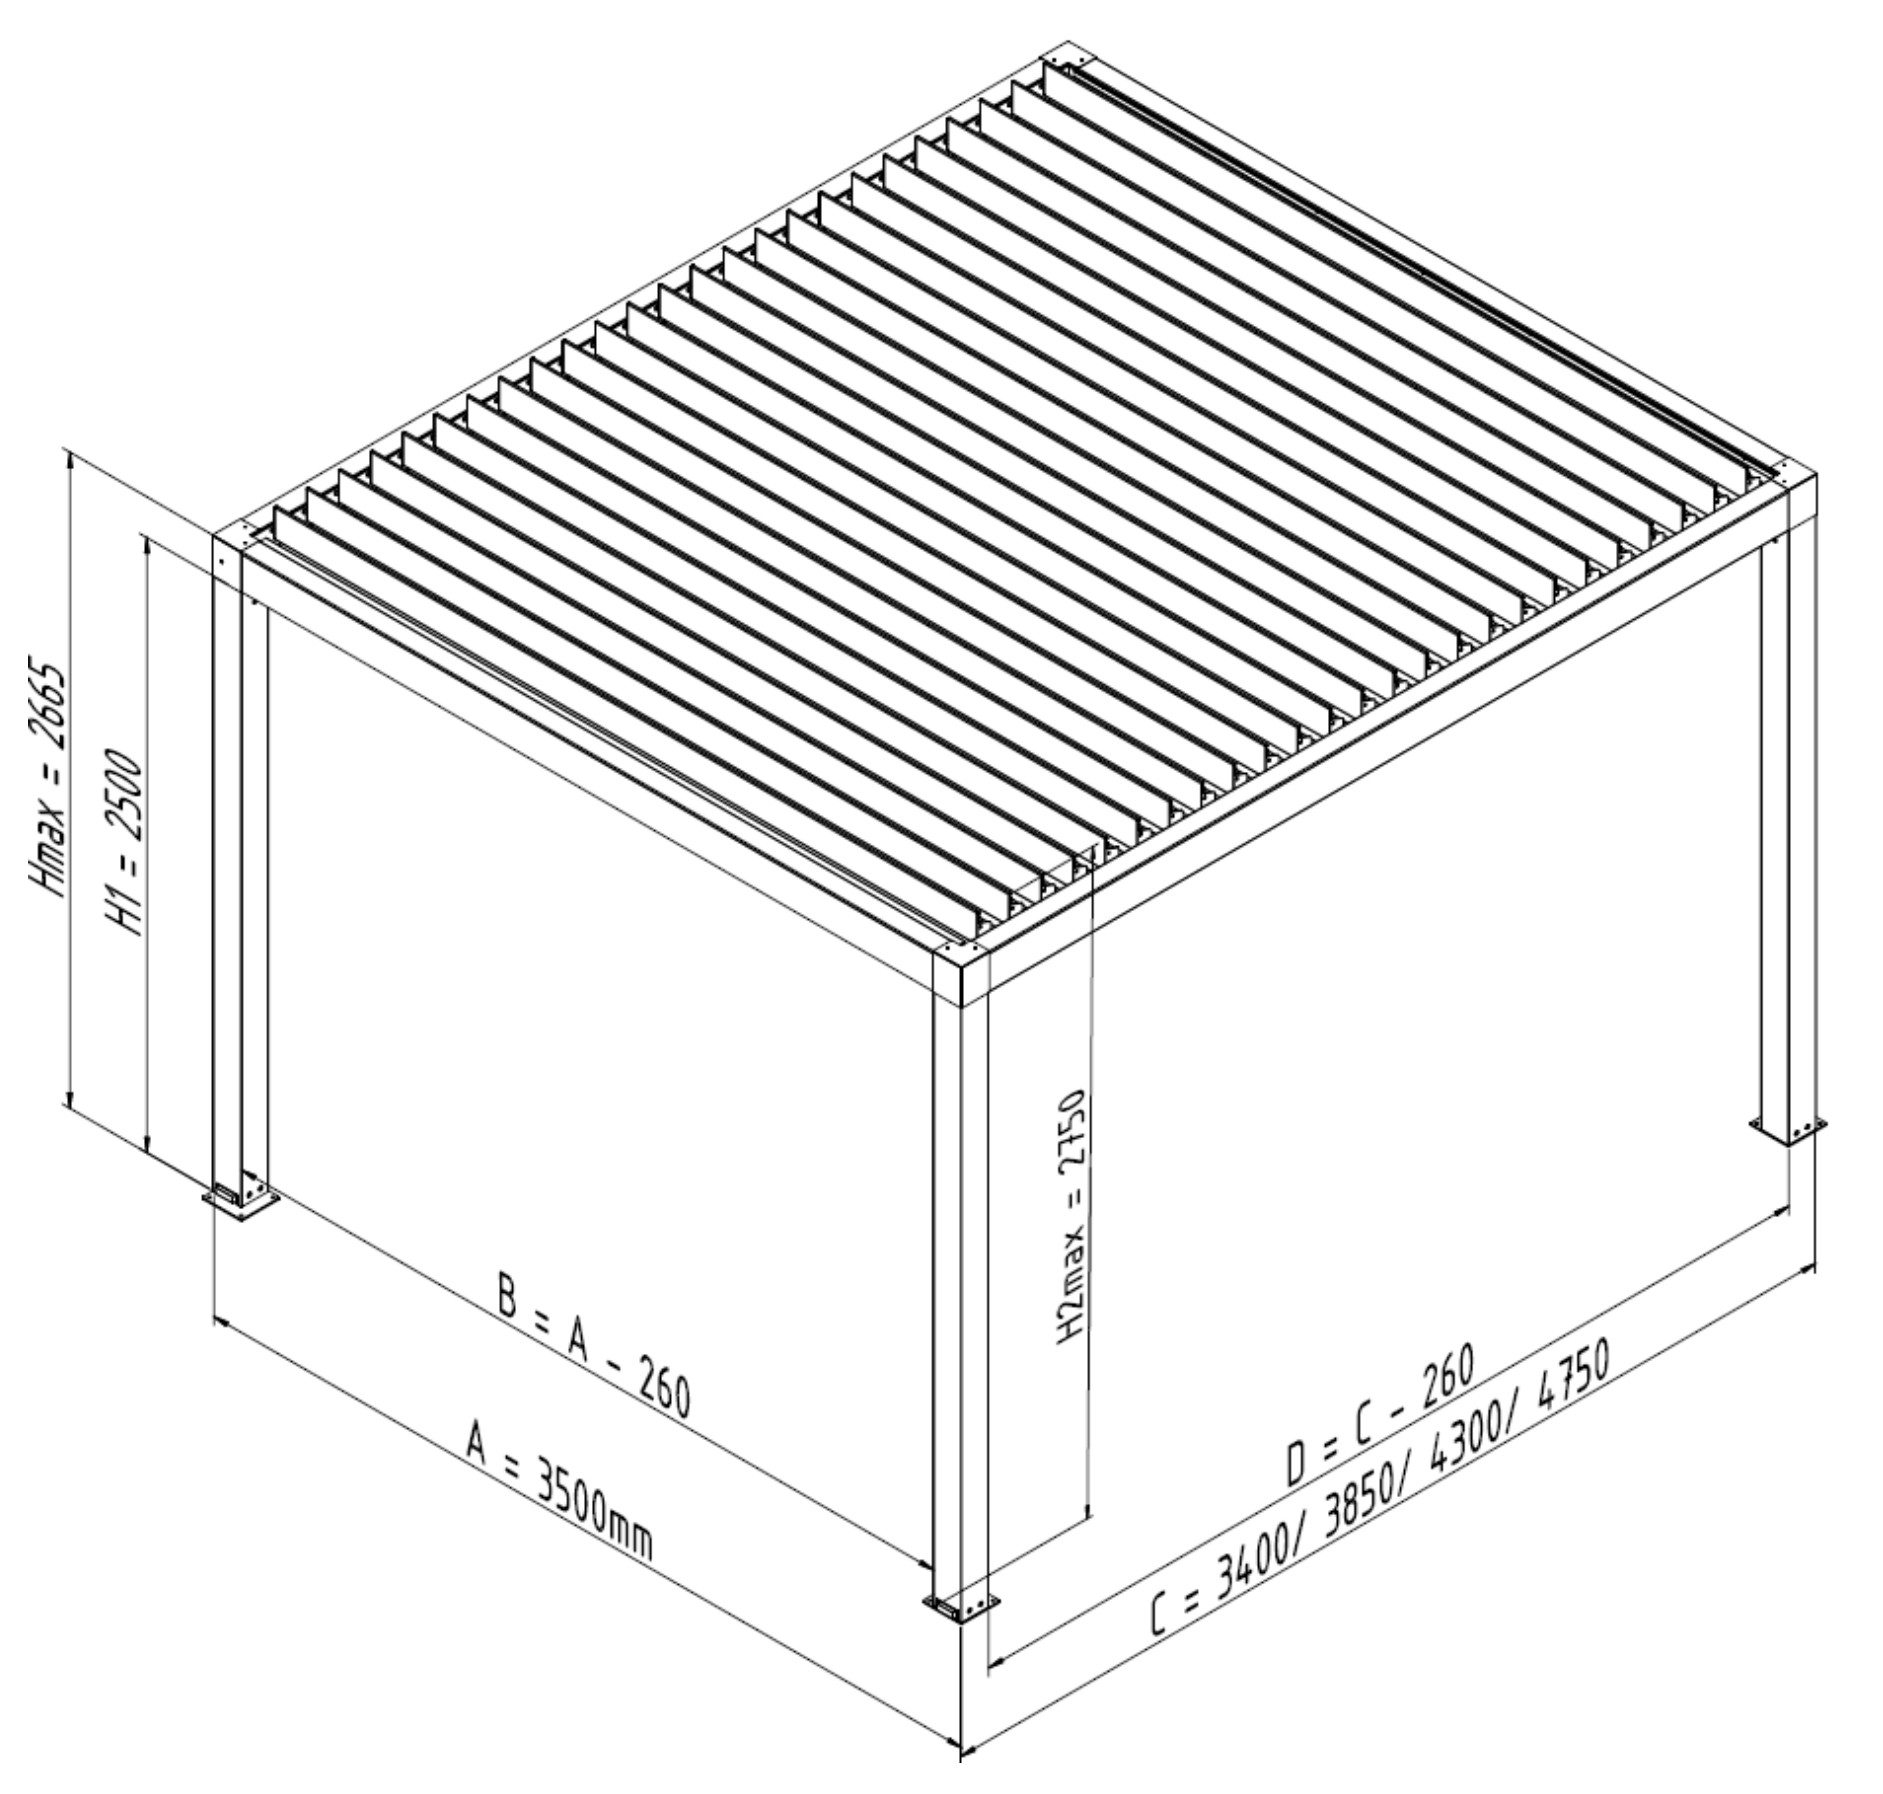
Pergolas from Knall
When ordering a pergola from Knall, you choose a custom approach, ensuring you receive a product perfectly tailored to your needs. Our team pays attention to every detail to ensure the finished product meets all expectations and is precisely the dimensions you require. Carefully selected, high-quality materials not only give the pergola an aesthetic appearance but also ensure its durability and reliability. We'll help adapt the structure to your space, creating an ideal spot for relaxation and protection from the sun or rain.
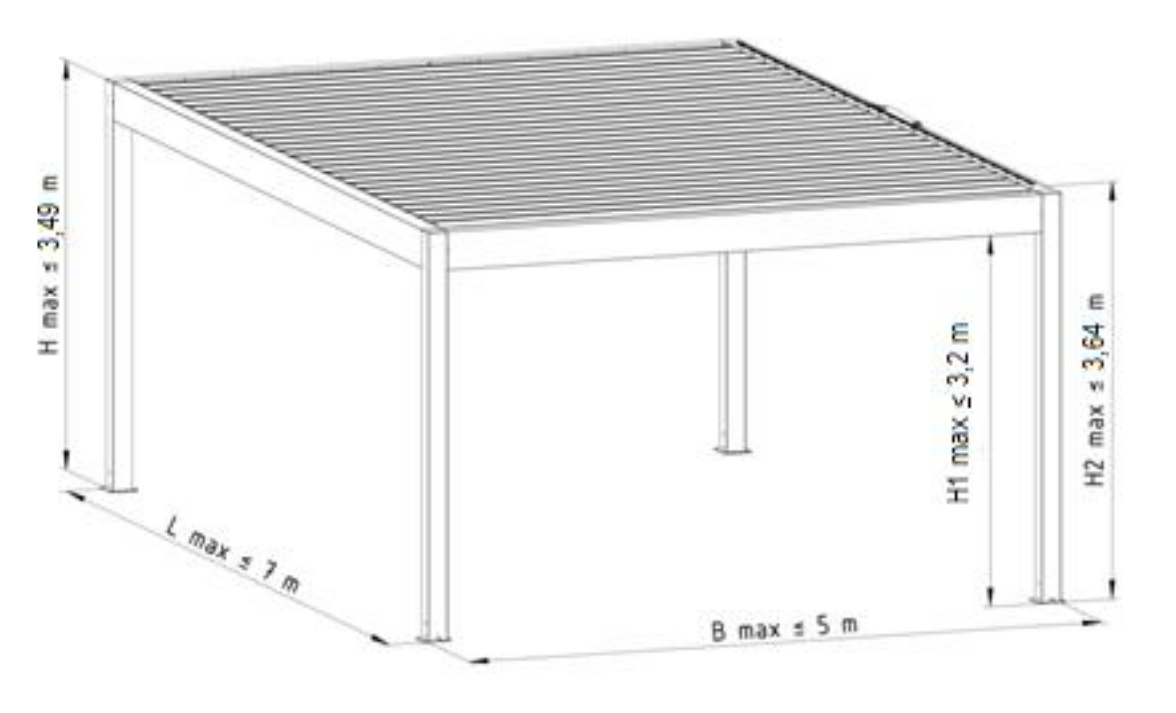
Pergola SB400
freestanding single-module
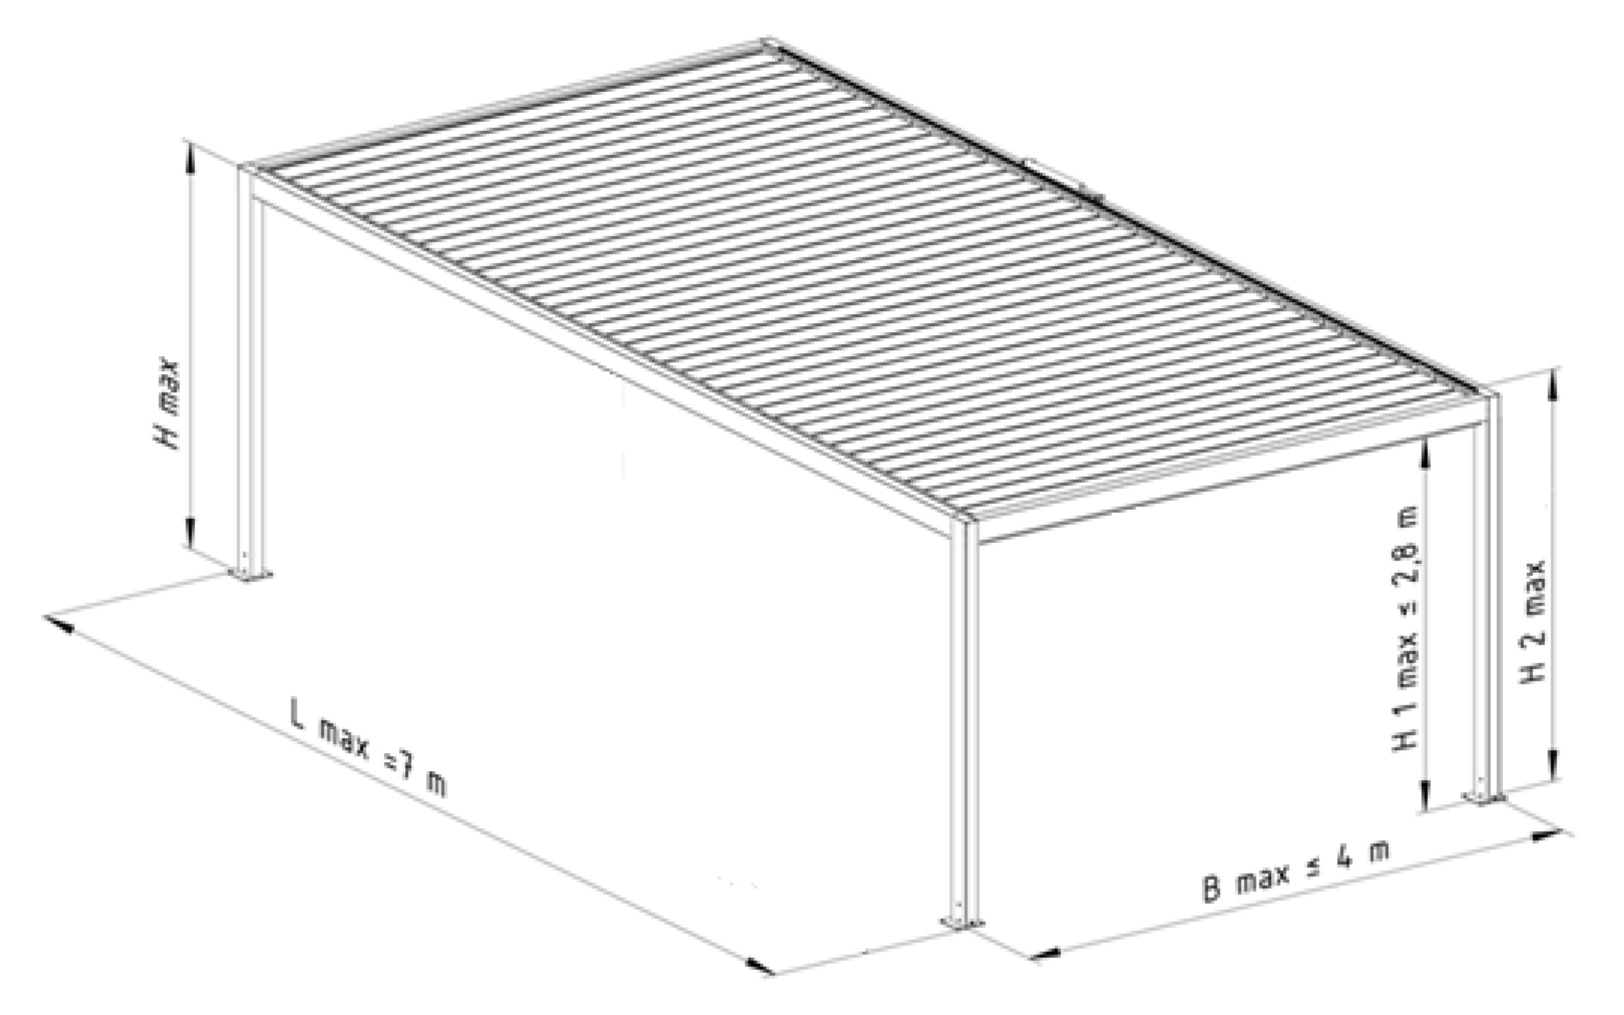
freestanding multi-module

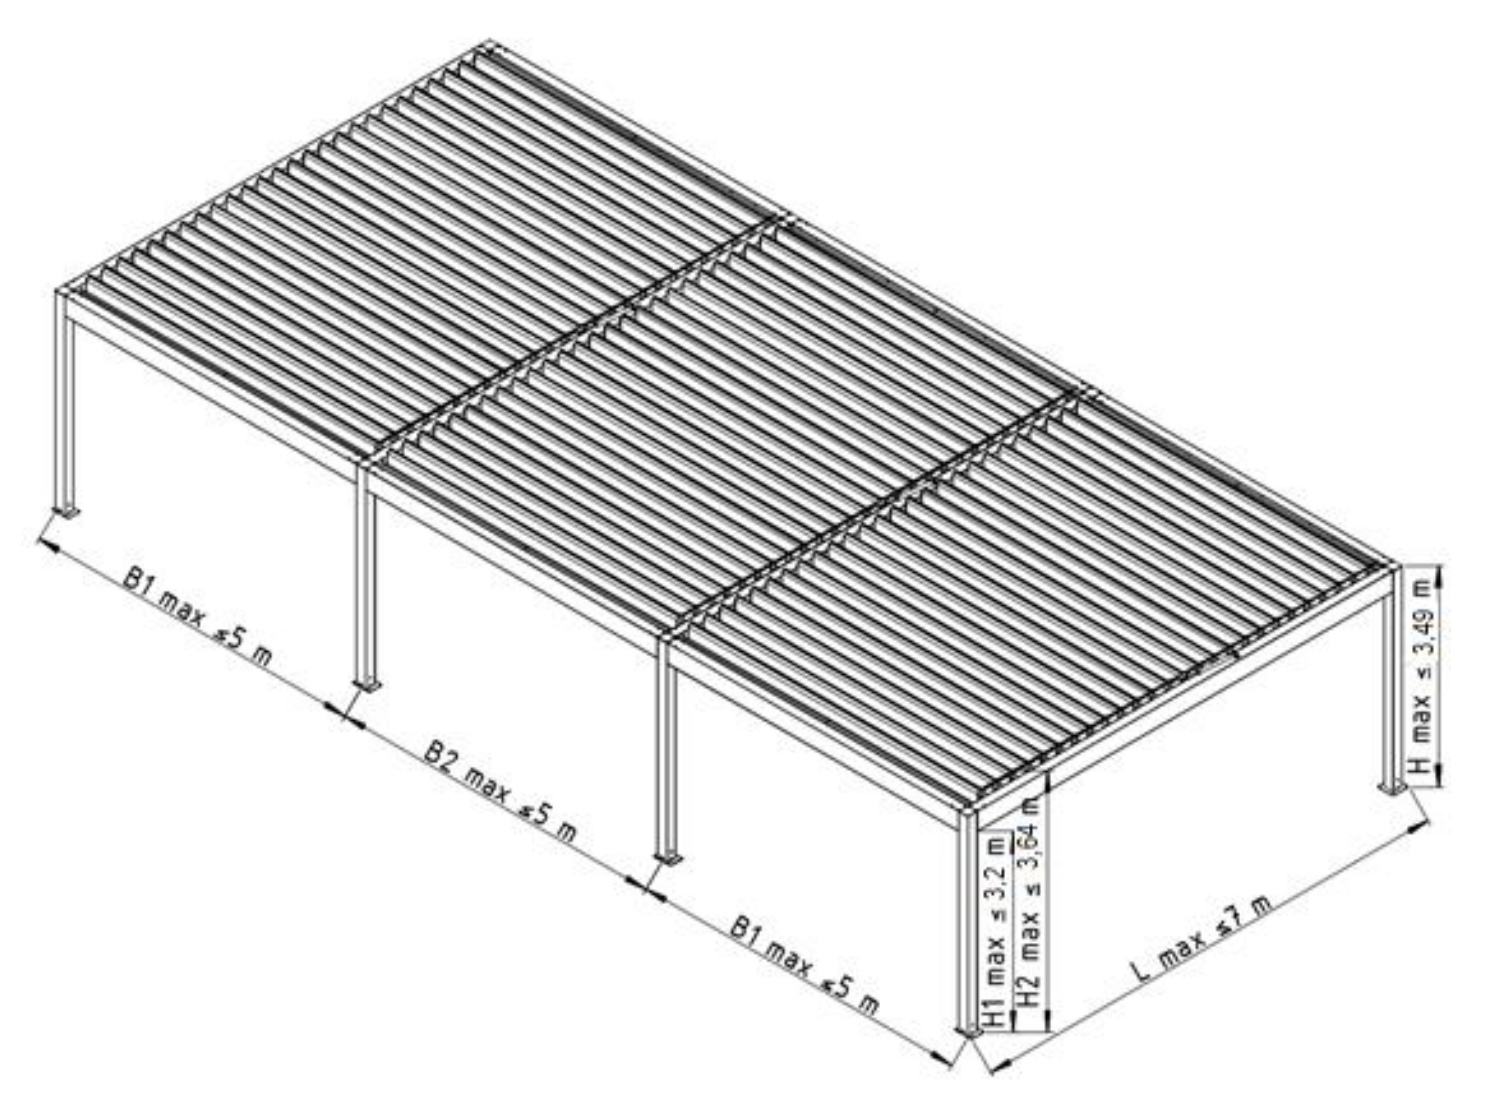
Pergola SB500
freestanding single-module
freestanding multi-module
Pergola SOLID
freestanding single-module
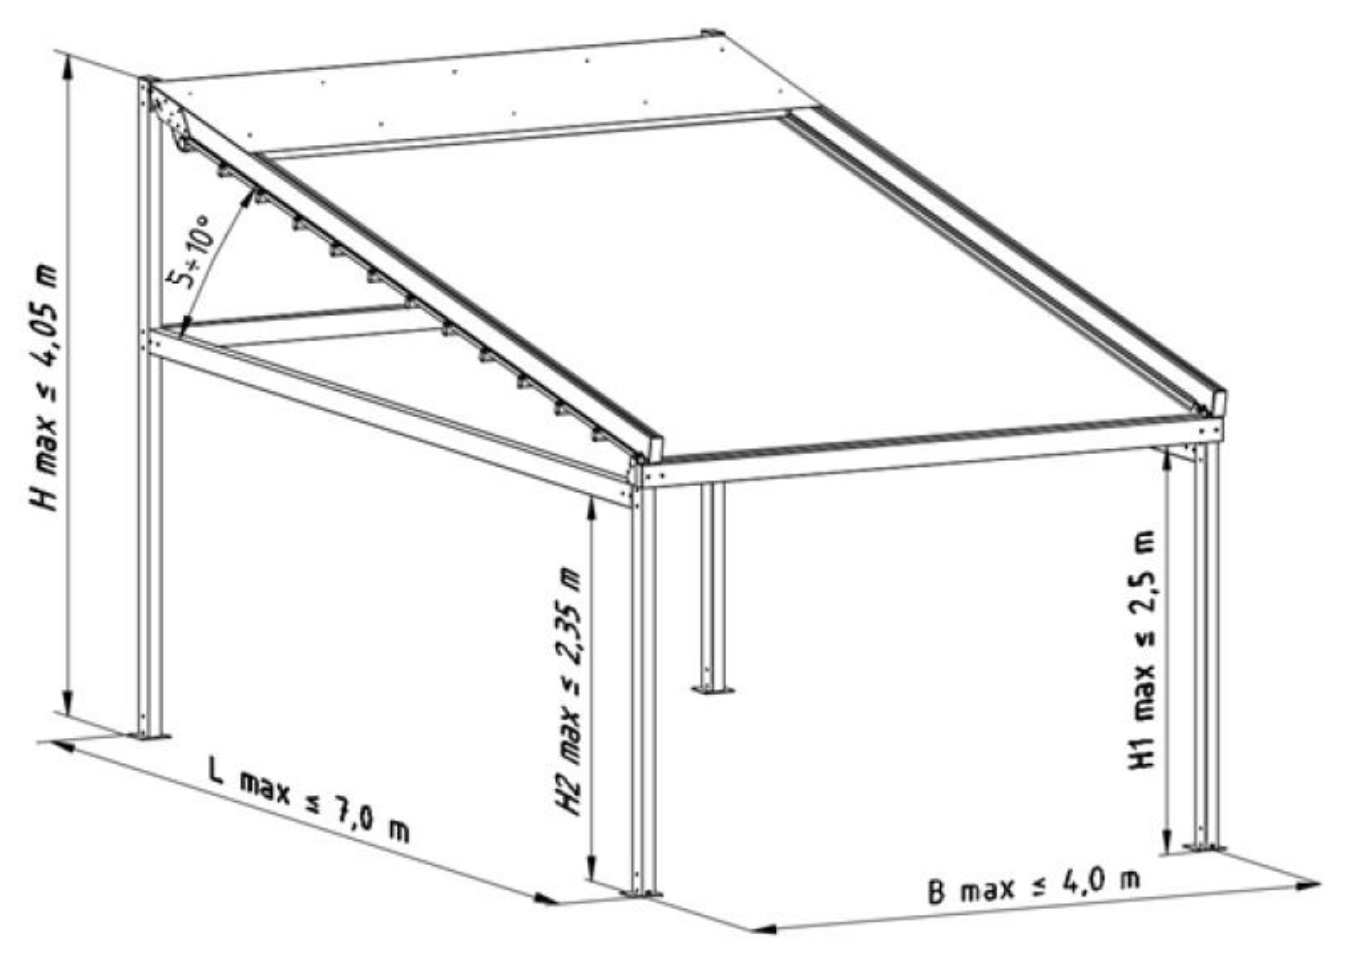
freestanding multi-module
Pergola SOLID
wall-mounted single-module
wall-mounted multi-module
Pergola ZIIIP
wall-mounted single-module
Eyelet Curtains
Measurement Instructions for Eyelet Curtains
To ensure the curtain fits perfectly, the chosen location must be accurately and carefully measured.
The following illustrative diagrams must be strictly followed.
Eyelet Curtain
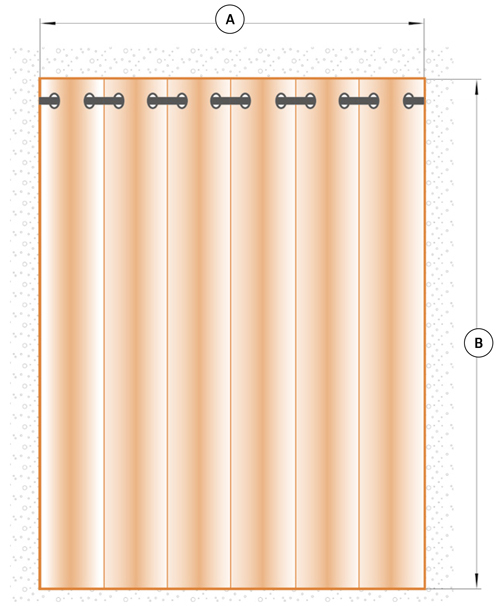
- A - WIDTH Width of the curtain rod
- B - HEIGHT Height of the curtain*
- Ring diameter 4 cm.
- Stiffening tape 10 cm.
- Ring colours: silver, gold
- Gathering ratio 1:2
The width of the finished curtain rod reflects the dimension of the unfolded, gathered fabric.
*Measure the height from the top of the curtain rod to the floor, adding 2 cm (necessary for ring punching). Note! The given measurement refers to the total height of the final product (dimension B, finished curtain). To avoid the curtain brushing the floor, we recommend deducting up to 10 cm from the height (as preferred).
*All dimensions are given in millimetres.
Microflex Curtain
Measurement Instructions for Microflex Curtain
To ensure the curtain fits perfectly, the chosen location must be accurately and carefully measured.
The following illustrative diagrams must be strictly followed.
Microflex Curtain

- A - WIDTH Width of the curtain rod
- B - HEIGHT Height of the curtain*
- For curtains hung in pairs, please specify the side of the curtain: left or right.
The width of the finished curtain rod reflects the dimension of the unfolded, gathered fabric.
*Measure the height from the top of the curtain rod to the floor, add 2 cm (necessary for ring punching). Note! The given measurement refers to the total height of the final product (dimension B, finished curtain). To avoid the curtain brushing the floor, we recommend deducting up to 10 cm from the height (as preferred).
*All dimensions are given in millimetres.
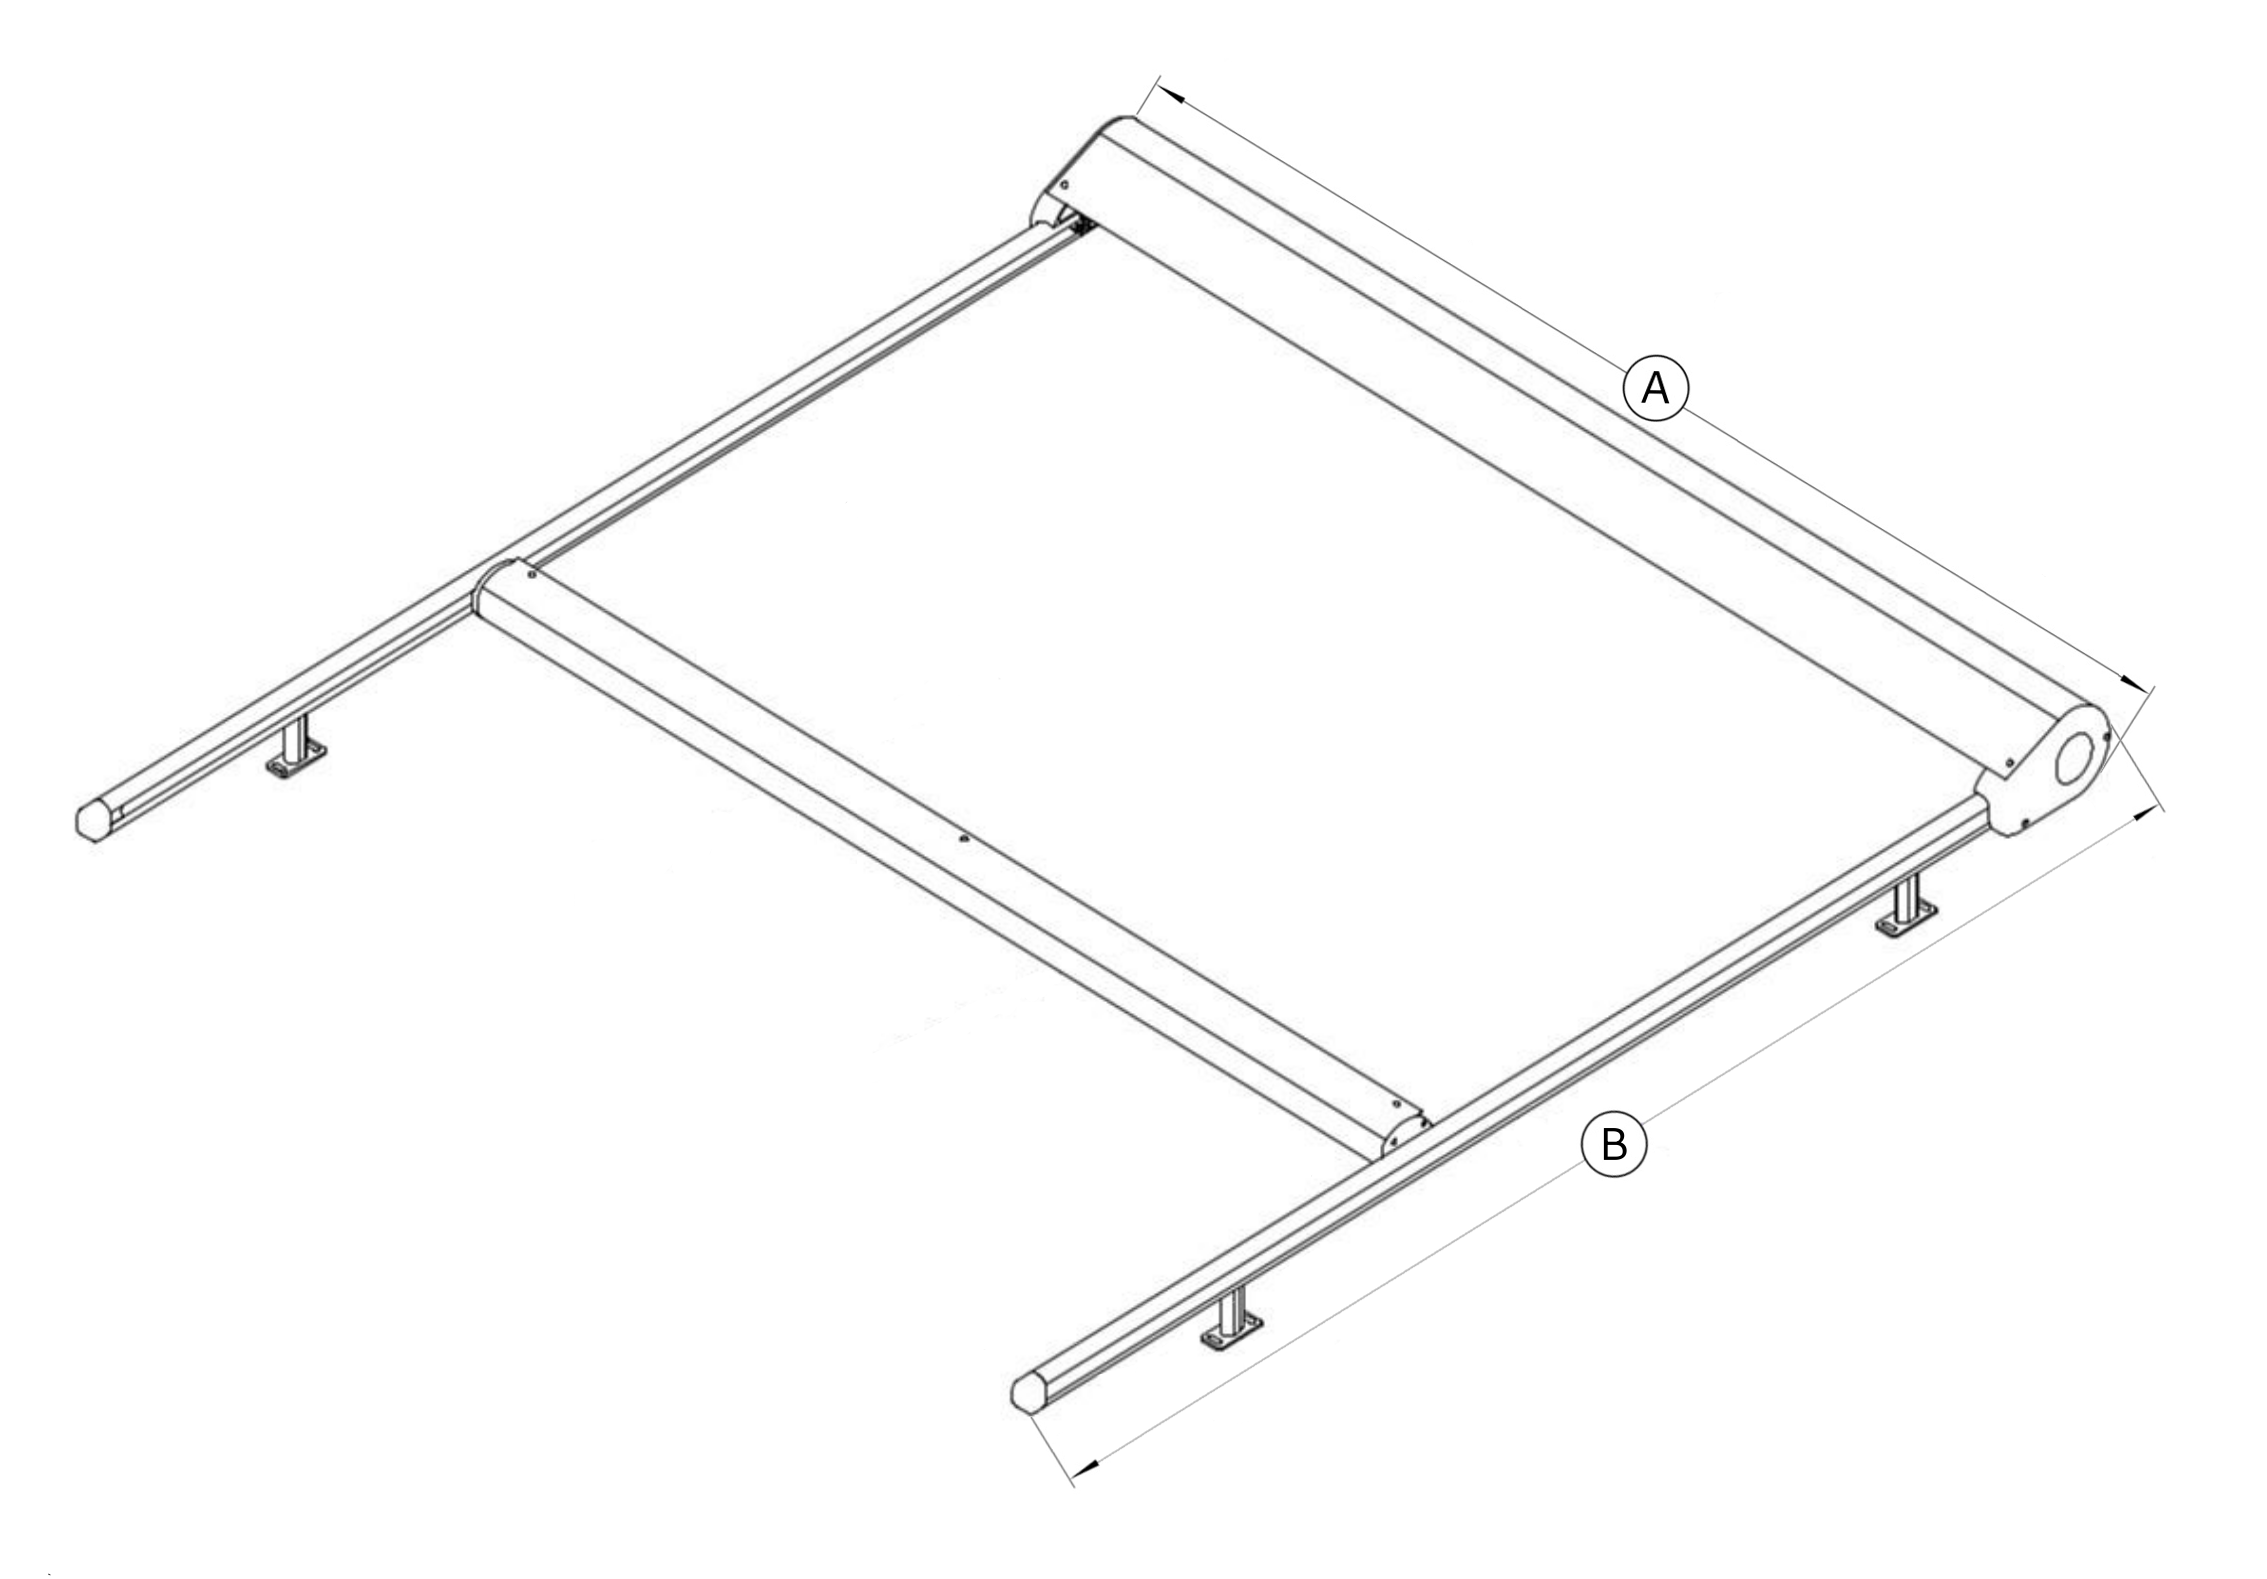
KNALL electric curtain
Measuring Instructions for Knall Curtain Rail
The long and trouble-free operation of the sunshade depends not only on the high quality of its construction but also on its proper fitting and installation. To ensure the awning fits perfectly, the chosen location must be properly and carefully measured.
It is absolutely essential to follow the below auxiliary drawings.
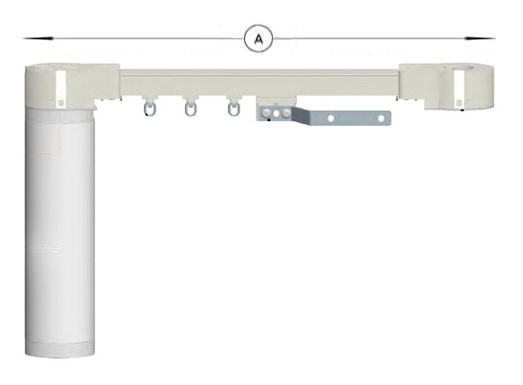
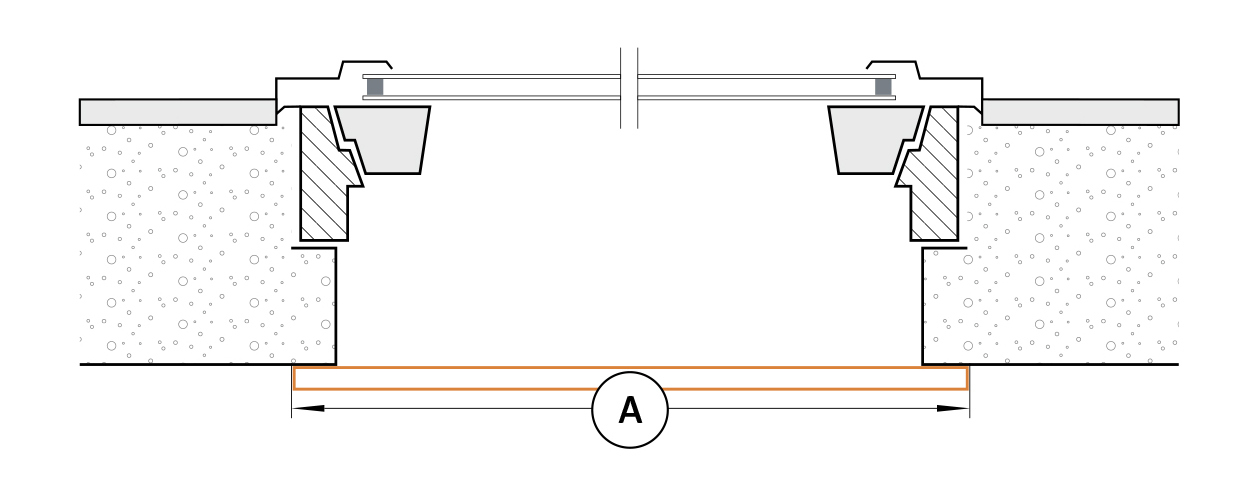
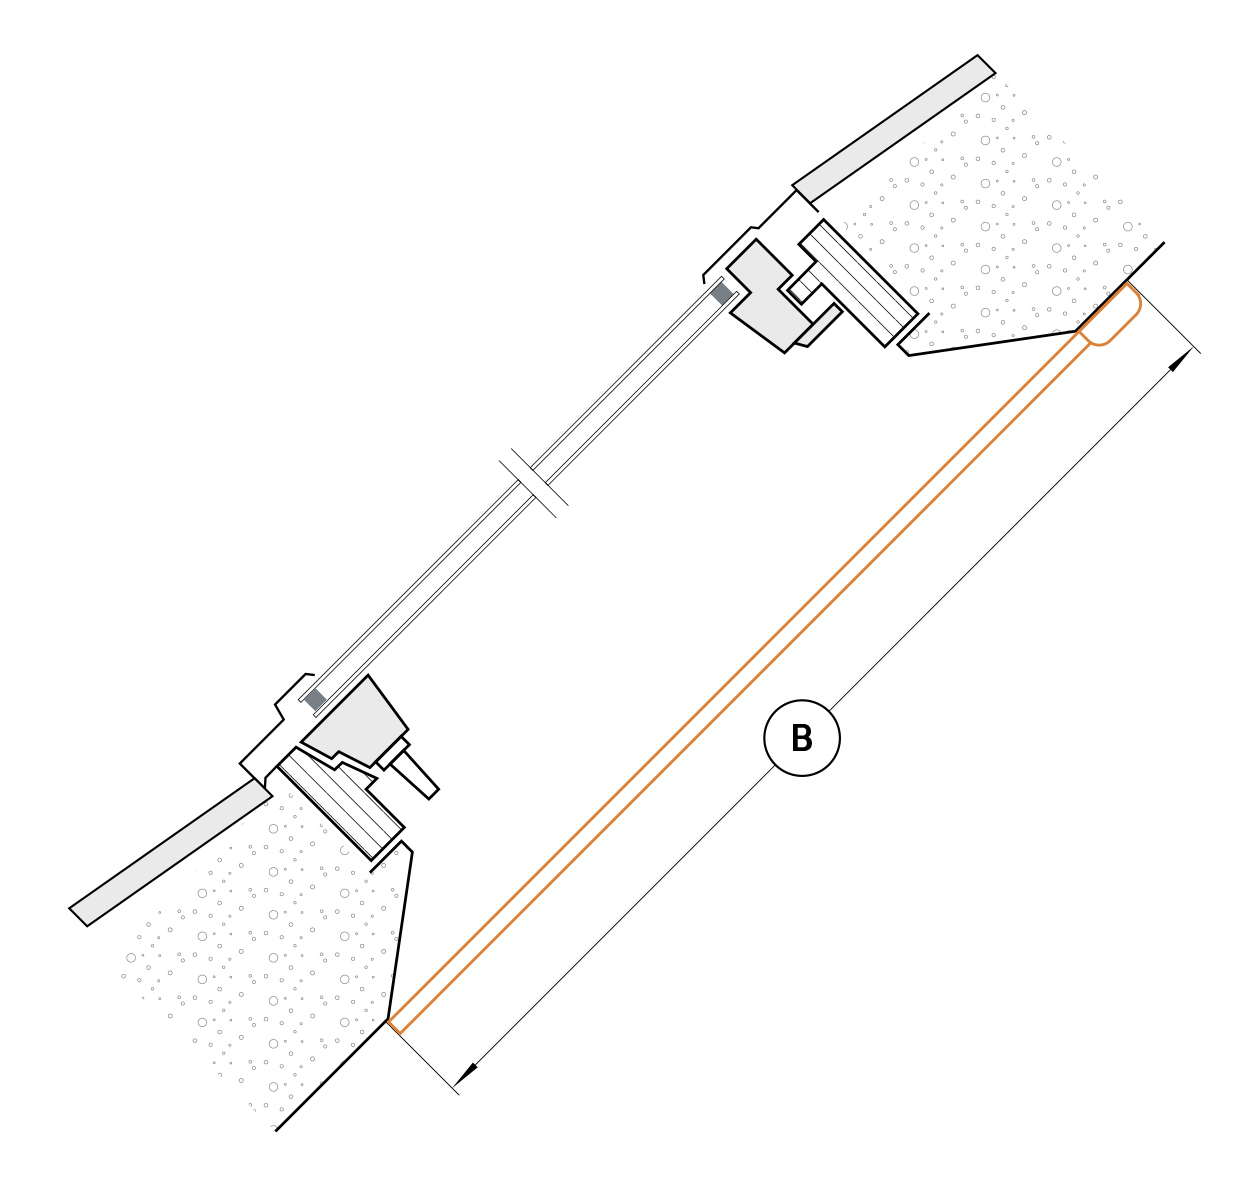
- A - WIDTH Dimension A is the total length of the system from the motor included to the end of the curtain.
If one straight line in any dimension exceeds 2.4 m, it will be divided into 2 equal parts, the connector is included in the set.
*All dimensions are given in millimeters.
Insect screens for window frames
Measurement Instructions for Window Mosquito Screens
Long and faultless operation of the window screen depends not only on its high-quality construction but also on its proper fitting and installation. To ensure the screen fits perfectly, the chosen location must be accurately and carefully measured.
The following illustrative diagrams must be strictly followed.
Frame Mosquito Screen
 Window - side view
- A - WIDTH This is the width of the window frame's "clear opening". Measured from gasket to gasket.
- B - HEIGHT This is the height of the window frame's "clear opening". Measured from gasket to gasket.
- C - FLANGE THICKNESS
- I - Window frame
- II - Window frame gasket
- III - Window sash
Frame Mosquito Screen, top view:

- A - Width
- B - Height
Cross-section and mounting clips:
Profile cross-section

Mounting clip
Flange, dimension C

Cross-section of the mounted mosquito screen

Standard Roll-Up Mosquito Screen
- A - WIDTH This is the width of the external window recess. If the width of the recess is not uniform at all points, the smallest dimension of the recess should be used.
- B - HEIGHT This is the height of the external window recess. If the height of the recess is not uniform at all points, the smallest dimension of the recess should be used.
Two models
Roll-up mosquito screens from Knall feature a compact cassette (47mm), tight side guides (38mm), and an easy-to-operate movable profile (65mm). For roof windows, we offer models with a bottom profile (15mm), ensuring perfect fit and easy installation.


Roll-Up Roof Mosquito Screen
Roof recess - top view (width)
Roof recess - side view (height)
- A - WIDTH This is the width of the internal roof recess, adding dimensions for the guides 8 cm (2x4 cm).
- B - HEIGHT This is the height of the internal roof recess, adding dimensions for the cassette 10 cm.
Two models
Roll-up mosquito screens from Knall feature a compact cassette (47mm), tight side guides (38mm), and an easy-to-operate movable profile (65mm). For roof windows, we offer models with a bottom profile (15mm), ensuring perfect fit and easy installation.
Roller fly screen
Measuring Instructions
Knall roller fly screen
The long and trouble-free operation of the window screen depends not only on the high quality of its construction but also on its proper fitting and installation. For the screen to fit perfectly, the chosen spot must be correctly and carefully measured.
It is absolutely essential to follow the instructions in the diagrams below.
- A - WIDTH This is the width of the external window recess. If the width of the recess is not the same at all points, the smallest dimension should be taken.
- B - HEIGHT This is the height of the external window recess. If the height of the recess is not the same at all points, the smallest dimension should be taken.
Two Models
Knall's roll-up mosquito nets feature a compact cassette (47mm), side guides (38mm), and an easy-to-use movable profile (65mm). For roof windows, we offer models with a lower profile (15mm), ensuring perfect fitting and easy installation.
Mosquito net on the collar
Measuring Instructions Mosquito net on the collar
The long and trouble-free operation of the window screen depends not only on the high quality of its construction but also on its proper fitting and installation. For the screen to fit perfectly, the chosen spot must be correctly and carefully measured.
It is absolutely essential to follow the instructions in the diagrams below.
Roof Recess - Top View (width)
Roof Recess - Side View (height)
- A - WIDTH This is the width of the internal roof recess, plus an additional 8 cm for the side guides (2x4 cm).
- B - HEIGHT This is the height of the internal roof recess, plus an additional 10 cm for the cassette.
Two Models
Knall's roll-up mosquito nets feature a compact cassette (47mm), tight side guides (38mm), and an easy-to-use movable profile (65mm). For roof windows, we offer models with a lower profile (15mm), ensuring perfect fitting and easy installation.
Door mosquito nets standard
Measurement Instructions for Door Mosquito Screens
Long and faultless operation of the door screen depends not only on its high-quality construction but also on its proper fitting and installation. To ensure the screen fits perfectly, the chosen location must be accurately and carefully measured.
The following illustrative diagrams must be strictly followed.
Door Mosquito Screen
The door mosquito screen is measured from the outside.
 Doors - top view
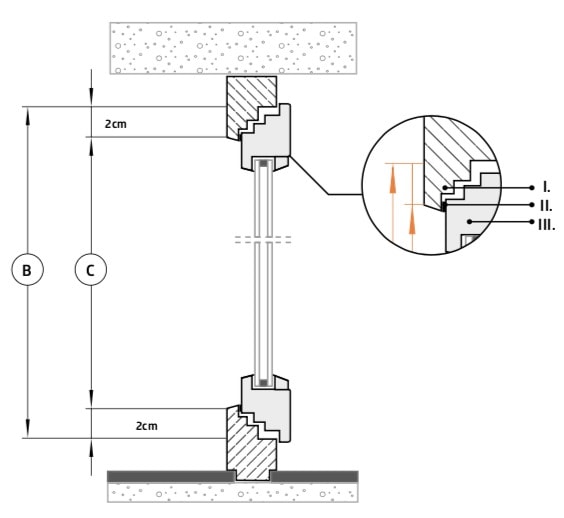 Doors - side view
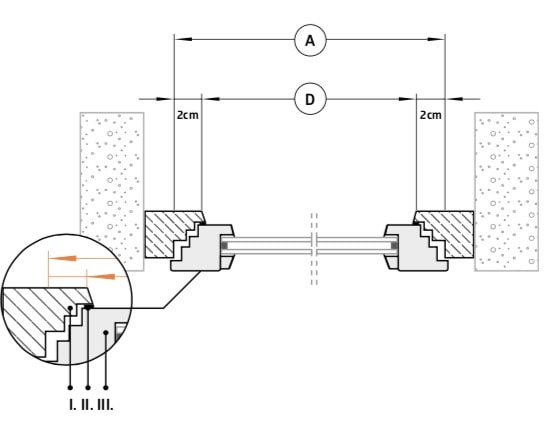
- A - SCREEN WIDTH This is the width of the window frame opening measured from edge to edge of the external door frame, increased by 2cm on each side. (A=D+4cm).
- B - SCREEN HEIGHT This is the height of the window frame opening measured from edge to edge of the external door frame, increased by 2cm on each side. (B=C+4cm).
- C - HEIGHT Measured from edge to edge of the external door frame.
- D - WIDTH Measured from edge to edge of the external door frame.
- I - Door frame
- II - Door frame gasket
- III - Door sash
*Additional 23mm for hinges and 13mm for handle are needed to attach the mosquito screen. These components extend beyond the main dimensions of the mosquito screen frame.
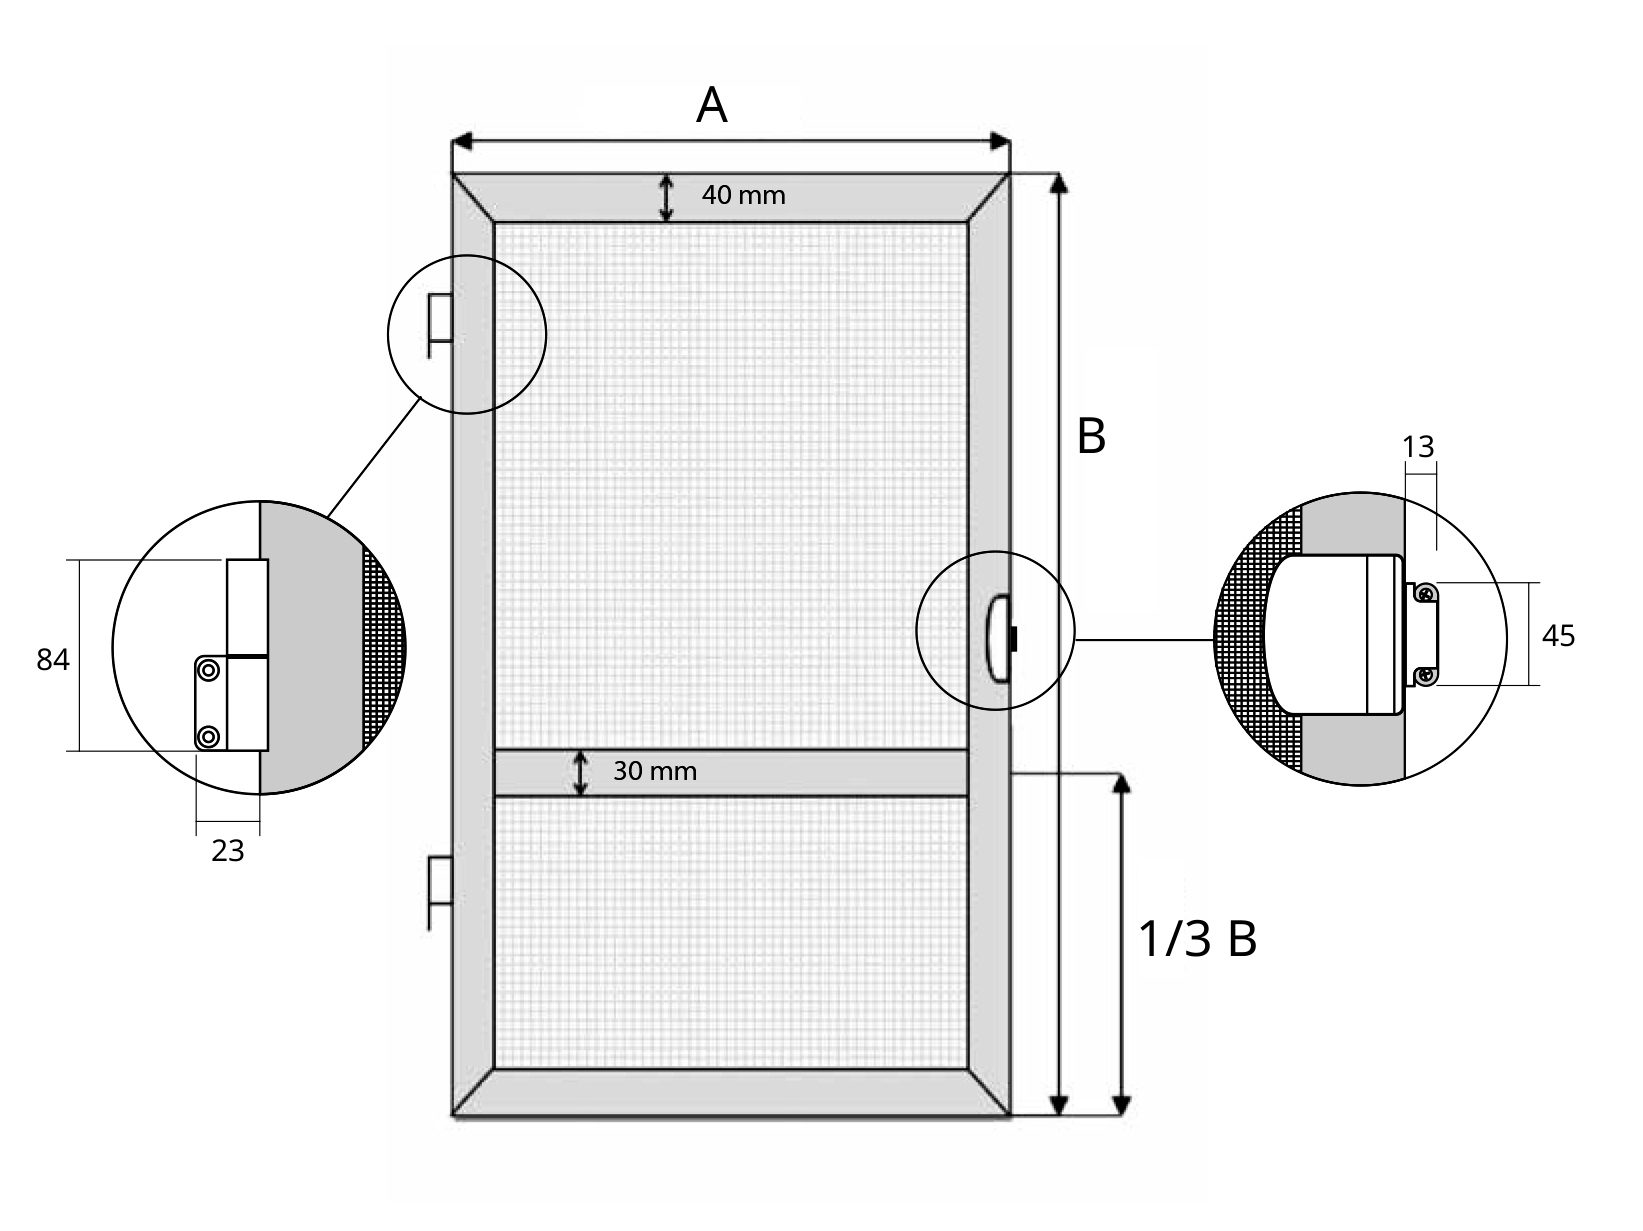
*The frame mosquito screen is designed for installation on doors opening inward.
Plisse Door Mosquito Screen DEORA
- A - WIDTH This is the width of the external door recess.
- B - HEIGHT This is the height of the external door recess.
The Deora mosquito screen can be used for doors opening inward.
Dimensions A and B will be the dimensions of the finished product.
Mosquito Screen Dimensions When Folded
| Mosquito Screen Width [mm] | Min. Set Width [mm] | |
|---|---|---|
| Minimum | Maximum | |
| 600 | 800 | 120 |
| 801 | 1200 | 130 |
| 1201 | 1600 | 145 |
| 1601 | 2000 | 155 |
| 2001 | 2400 | 170 |
| 2401 | 3000 | 185 |
| 3001 | 4000 | 210 |
Mosquito Screen Width |
Set Width |
|
Control Side - Mosquito Screen DEORA
The control side is specified when looking from the outside of the building.

Left Control

Right Control
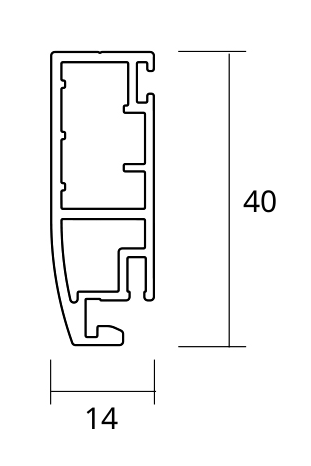
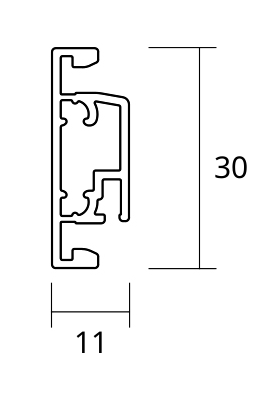
Components of the Plisse Mosquito Screen

guide

sliding profile

low bottom profile
(adhesive)

angled bottom profile
(adhesive)

high bottom profile
(screw-in)
*All dimensions are provided in millimetres.
DEORA Pleated Mosquito Net
Measuring Instructions DEORA Pleated Mosquito Net
The long and trouble-free operation of the product depends not only on the high quality of its manufacture but also on the correct fitting and installation. To ensure the mosquito net fits perfectly, the chosen location must be correctly and carefully measured.
It is imperative to follow the instructions in the diagrams below.
- A - WIDTH This is the width of the external door recess.
- B - HEIGHT This is the height of the external door recess.
The DEORA mosquito net can be used for doors that open inward into the building.
Dimensions A and B will be the dimensions of the finished product.
Dimensions of the Mosquito Net when Folded
| Mosquito Net Width [mm] | min. kit width [mm] | |
|---|---|---|
| minimum | maximum | |
| 600 | 800 | 120 |
| 801 | 1200 | 130 |
| 1201 | 1600 | 145 |
| 1601 | 2000 | 155 |
| 2001 | 2400 | 170 |
| 2401 | 3000 | 185 |
| 3001 | 4000 | 210 |
| Mosquito Net Width |
Kit Width |
|
Control Side - DEORA Mosquito Net
The control side is determined from the outside of the building.
Control on the left
Control on the right
Components of the Pleated Mosquito Net
guide
sliding profile
low bottom profile
(adhesive)
angled bottom profile
(adhesive)
high bottom profile
(screwed)
*All dimensions are given in millimeters.
MONUMO Rolled Fly Screen
Measuring Instructions MONUMO Single-Sided Rolled Fly Screen
The long-lasting and trouble-free performance of this product depends not only on its high-quality manufacturing but also on proper fitting and installation. To ensure the fly screen fits perfectly, the selected area must be accurately and carefully measured.
It is imperative to strictly follow the illustrative diagrams below.
Installation Inside the Recess
- A - WIDTH This is the width of the external door recess.
- B - HEIGHT This is the height of the external door recess.
If the dimensions of the recess vary at different points, the smallest measurement should be used to ensure ease of installation.
The MONUMO fly screen can be used for doors that open inward.
Dimensions A and B will be the final product dimensions.
Installation Outside the Recess
- A - WIDTH This is the width of the external door recess.
- B - HEIGHT This is the height of the external door recess.
We suggest that the fly screen be 50 to 139 mm wider (more details can be found in the auxiliary image provided under the fly screen variants section) and 50 mm taller than the recess to ensure easy installation and to prevent the movable profile from occupying space in the passage when the mesh is retracted.
The MONUMO fly screen can be used for doors that open inward.
Dimensions A and B will be the final product dimensions.
Variants

MONUMO Single-sided Fly Screen


MONUMO Double-sided Fly Screen

*1P - MONUMO single operated from the right; 1L - MONUMO single operated from the left
Dimensions of Other Components

Side Profile with Magnet

Side Profile with Clips

Upper Rail with Seals
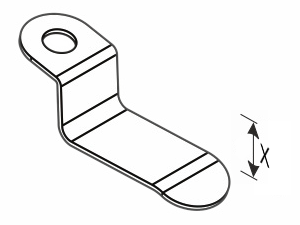
PVC Bottom Rail

Inclined PVC Bottom Rail 7°
*All dimensions are provided in millimetres.
Roof Blinds VELUX / FAKRO

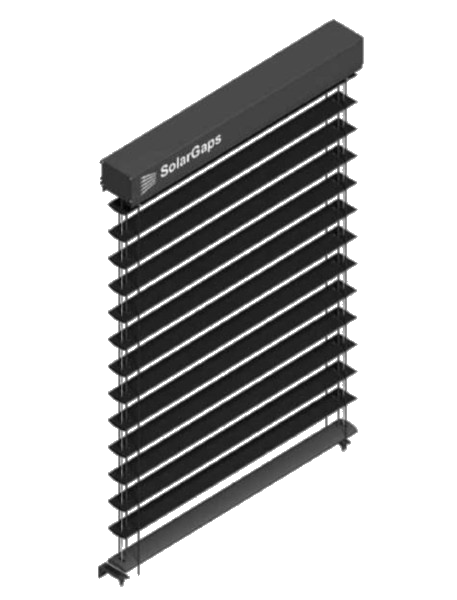
Solar panel blinds
Measurement Instructions Solar panel blinds
The long and trouble-free operation of the window cover depends not only on the high quality of its manufacture, but also on its proper fitting and assembly. For the aperture to fit perfectly, the chosen location must be correctly and carefully dimensioned.
The following auxiliary drawings must be strictly adhered to.
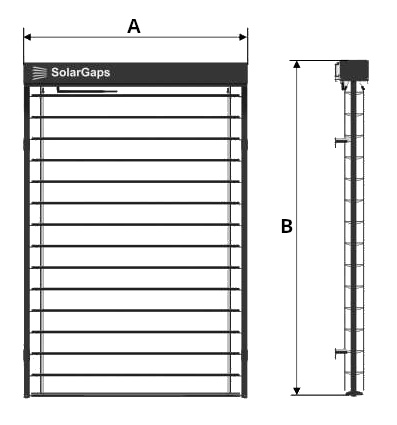
- A - Width This is the total width of the system
- B - Height This is the total height of the system
*In the case of wall installation (outside the window recess), it is recommended that the system be larger than the window recess by 75 mm in width and 115 mm in height for ease of installation.
Solar panel blinds type
TYPE R - Classic guides
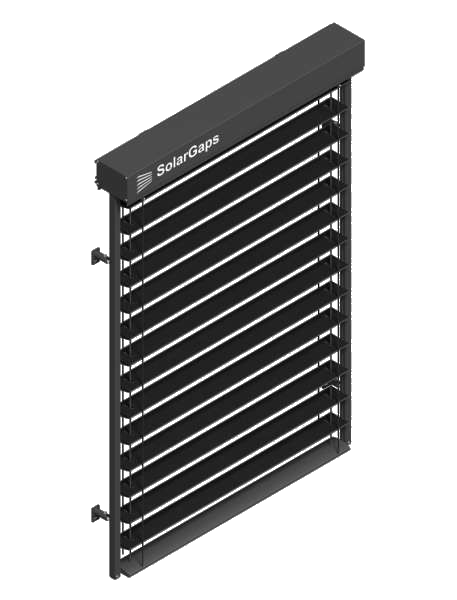
TYPE W - Cable guiding
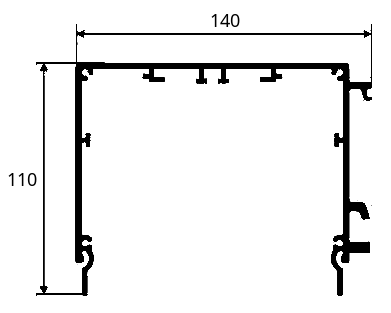
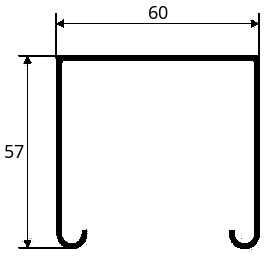
Dimensions of components
Box
Package
Louvre
Box with mounting bracket

Mounting bracket
Guide
(only type R)
Guide bracket
(only type R)
Double guide bracket
(only type R)
Wire bracket
(only type W)
Garage gates
Measuring Instructions for Sectional Garage Doors
The long-lasting and trouble-free operation of the garage door depends not only on its quality but also on accurate measurement and proper installation. To ensure the door fits the opening perfectly, precise measurements are crucial.
It is imperative to follow the below instructions closely.
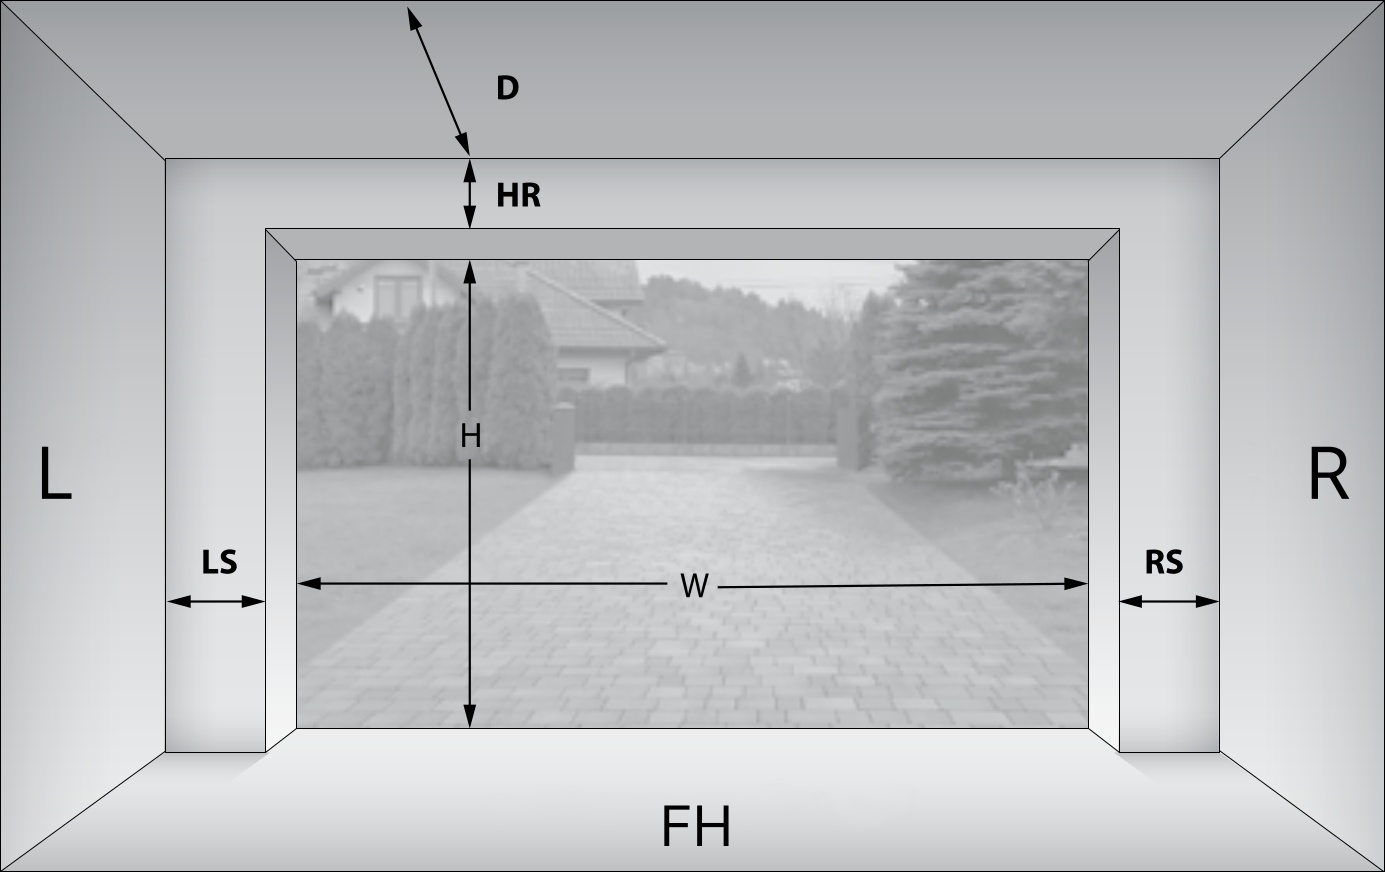
L - Left, R - Right, FH - Final floor height
- W - WIDTH (dimension A) This is the width of the opening after it has been finished.
- H - HEIGHT (dimension B) This is the height of the opening after it has been finished.
- LS - left jamb (side space) minimum 110 mm
- RS - right jamb (side space) minimum 110 mm
- HR - lintel
- D - depth of the garage
- • The ordered width of the door = the width of the garage entrance after it has been finished (W)
- • The ordered height of the door = the height of the garage entrance after it has been finished (H)
- • Measurements must be made for finished walls and floors.
- • Check for any obstacles within the planned door area that could prevent installation or its uninterrupted operation (e.g., ceiling beams, pipes, windows, doors opening into the garage).
- • When configuring the garage door, the manufacturer selects the type of guides and the balancing system:
- - the choice of balancing system depends on the dimensions and weight of the door
- - the choice of guides and the placement of the balancing system depends on the height of the lintel
*All dimensions are given in millimetres.