Assembly instructions
Roller shutters

Installation of roller shutters
Screen Blinds
Installation of Screen blinds
Roller Blinds MGS
Characteristics
- Self-locking chain mechanism allowing the blind to stop at any position
- Available hardware colours (mechanism, brackets, chain): white, brown
- Cover profile resembling a cassette
- Available fabrics: plain and day-night
- Ability to cover large surfaces
- Mounted to the wall or ceiling using dowels
- Blind operation: chain
- Maximum width: 2.8 m (depending on fabric weight)
- Wide range of fabric colours
Roller Blinds MG
Characteristics
- Self-locking chain mechanism allowing the blind to stop at any position
- Available hardware colours (mechanism, brackets, chain): white, brown
- Available fabrics: plain and day-night
- Ability to cover large surfaces
- Mounted to the wall or ceiling using dowels
- Blind operation: chain
- Maximum width: 2.4 m (depending on fabric weight)
- Wide range of fabric colours
Pleated Blinds
Invasive Installation
Advantages:
- Stability and durability
- Aesthetic fit
- Adaptable to non-standard windows
- Wider choice of materials

Non-Invasive Installation
Advantages:
- No damage to window frames
- Ease of installation
- Mobility and portability
- Adjustable blind position
Pleated blind installation
Roman blinds
Roman blind installation
Venetian blinds 50mm (universal holder montage)
The advantages of installing wooden blinds using screw-in mounting brackets include:
- Stability and durability: The blinds are securely fastened, ensuring long-lasting and stable use without the risk of shifting or falling.
- Aesthetic finish: The screw-in bracket provides an aesthetically pleasing look as the mounting is concealed, and the blinds fit perfectly against the window.
- Safety: The secure attachment reduces the risk of accidental removal, which is especially important in homes with children.
- Precise fit: Allows for exact fitting of the blinds to the size and shape of the window, enhancing the effectiveness of light and privacy control.
- Material durability: Screw-in brackets better support the weight of the wooden slats, which is significant due to their weight.
Blinds Installation
Remote Pairing
Remote actuator diagram
Button actuator diagram
Venetian blinds 25mm
Invasive Installation
Advantages:
- Stability and durability
- Aesthetic fit
- Greater security of attachment
- Wider choice of materials
Non-Invasive Installation
Advantages:
- No damage to window frames
- Ease of installation
- Mobility and portability
- Adjustable blind position
25mm Blinds Installation
External Venetian blinds
Surface-Mounted Installation of External Venetian Blinds:
- Mounted on the façade, visible hardware and guides.
- Easy installation, ideal for existing buildings.
- Quick access to the mechanism, easy maintenance.
- May be less aesthetic and provide less insulation.
Flush-Mounted Installation of External Venetian Blinds:
- Blinds hidden under the façade, only the blinds are visible.
- More aesthetic, better thermal and acoustic insulation.
- Protected from weather conditions, more difficult access to the mechanism.
- Requires precise planning and is more expensive.
Installation C80
Installation Z90
Vertical blinds
Vertical blinds with screw-in mounting brackets:
- Stable and durable: Strong mounting ensures long-lasting use
- Aesthetic finish: The screw-in bracket conceals the mounting elements, providing a neat appearance
- Safety: Reduces the risk of accidental removal, ideal for homes with children
Vertical blinds installation
Vertical Awnings VMZ/VMB
Our supplier, FAKRO, offers a set of mounting brackets. With the VMX brackets, awnings can be installed by one person from inside the room. The brackets are universal and fit most openable windows, and with adjustable jaws, they are compatible with most window profiles available on the market. Additionally, they have protective pads (plastic pads) to prevent scratching the window. The installation of awnings with the set starts with placing the brackets on the window, then placing the awning cassette on the brackets. The next step is to install the guides, remove the brackets, and tighten the cassette. Detailed installation instructions can be seen in the installation video.
Installation instructions available for download in electronic version:
VMZ Awning
- VMZ manual
- VMZ Z-Wave cassette 85 mm
- VMZ Solar cassette 85 mm
- VMZ Z-Wave cassette 100 mm
- VMZ Solar cassette 100 mm
VMB Awning
VMZ manual
VMZ Z-Wave cassette 85 mm
VMZ Solar cassette 85 mm
VMZ Z-Wave cassette 100 mm
VMZ Solar cassette 100 mm
VMB Z-Wave
VMB Solar
Patio awnings
Installation of a patio awning with a cassette


Installation of a patio awning without a cassette
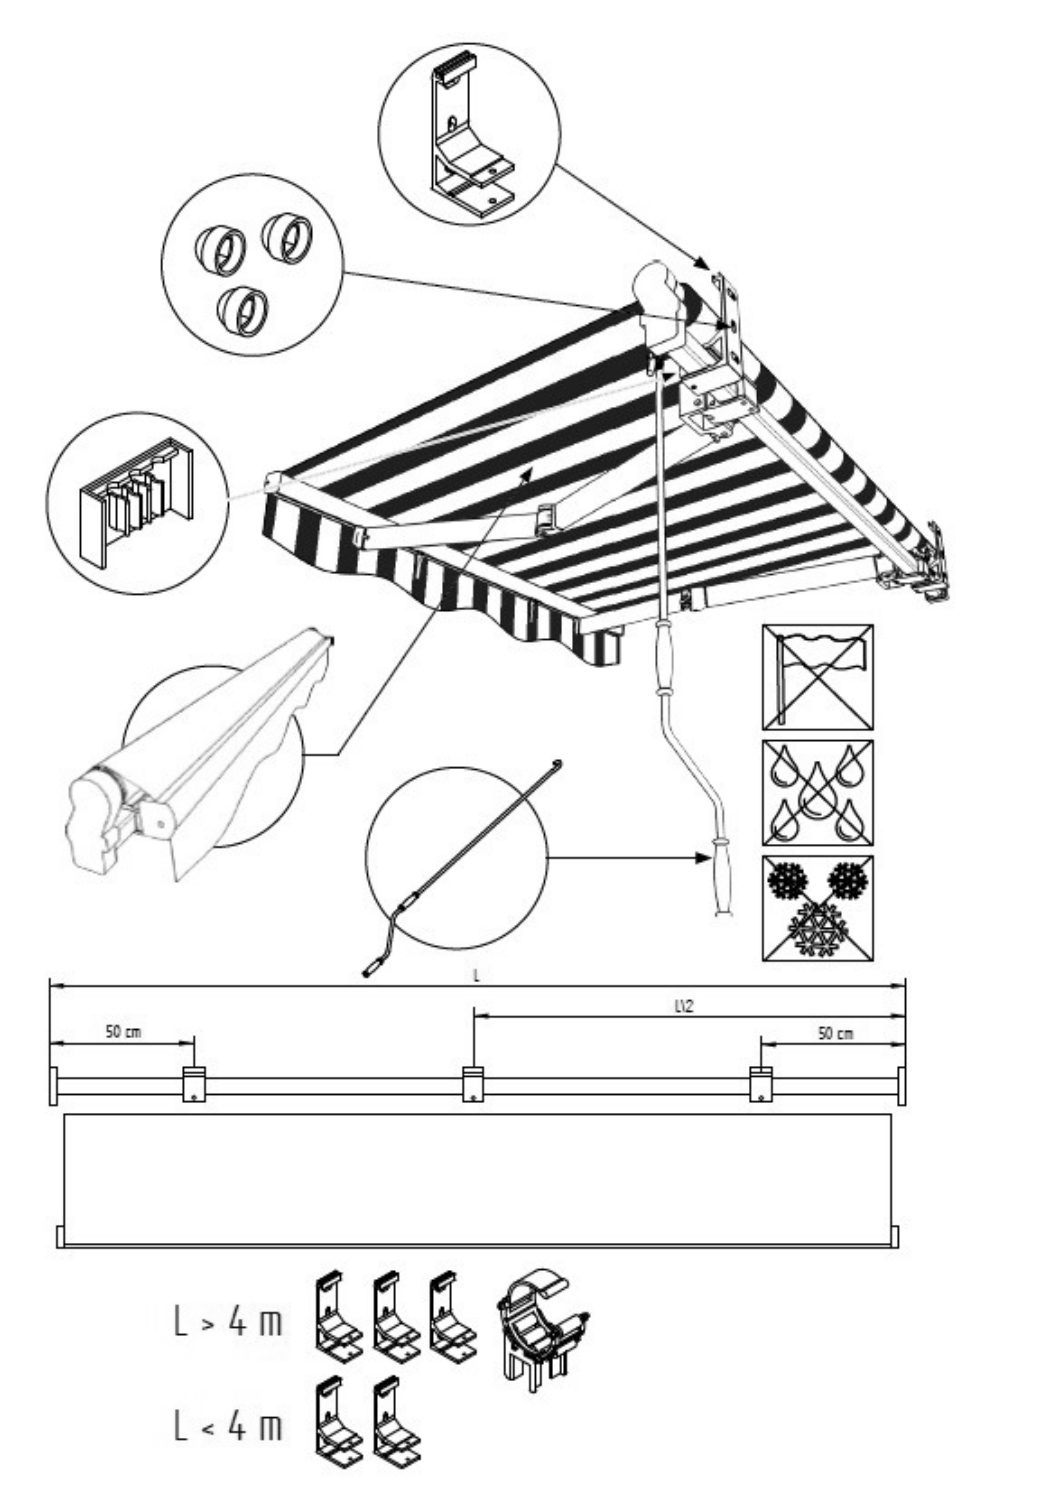

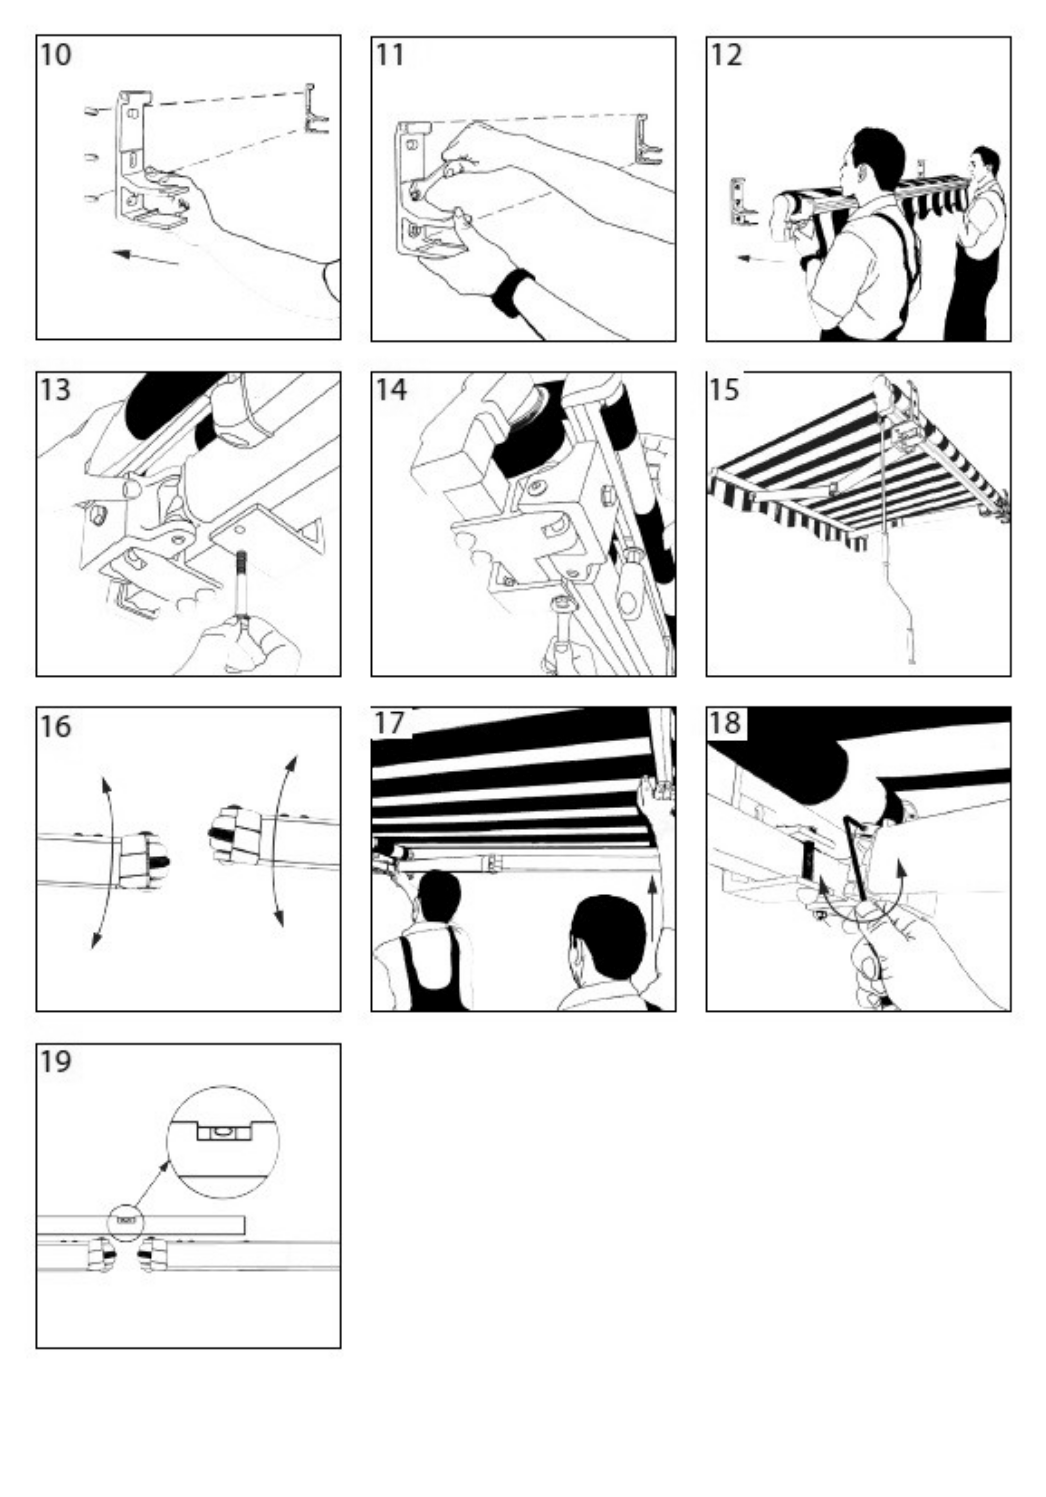
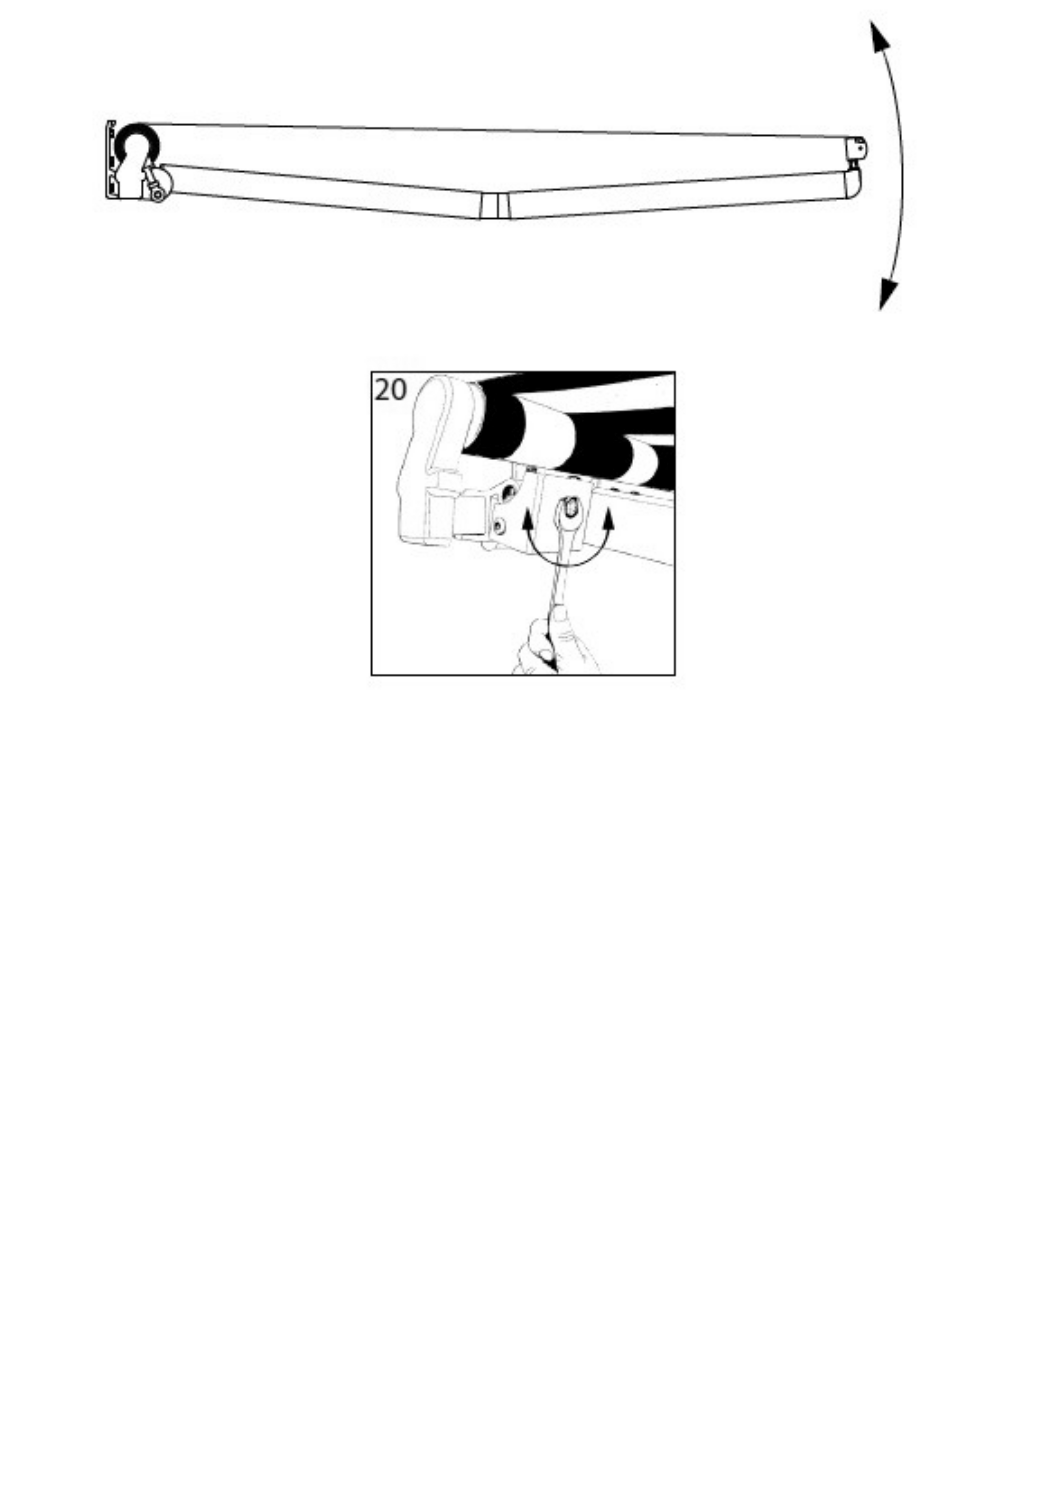
Installation of a cassette awning
Installation of an awning without a cassette
Conservatory blinds VERANDA
Characteristics
- Mounted on the roof
- Possibility to install multiple systems side by side
- System secured with solid mounting brackets
Installation of VERANDA awning
Balcony awnings
IBIZA montage
Pergola
Pergola SB400
Pergola SB500
Pergolas Solid
Electric curtain rail
Assembling the Curtain Rail
Smaller curtain rails are delivered as a whole, but longer ones may be divided into sections. In such cases, they should be joined using a screw connector, starting from one end. It is important to bring the ends of the transmission belt closer together, which will make it easier to connect the second part of the curtain rail. The metal curtain brackets should overlap. At this stage, we screw the connector onto the second part of the curtain rail and then securely attach the ends of the transmission belt together. If necessary, the second curtain hook can be turned to the other side. Standard wall mounting brackets are placed approximately 12 cm from the edge of the curtain rail. On the side without the motor, we install the end cap. The motor is installed after the curtain rail is mounted, by inserting the drive shaft into the hole and turning until the latch clicks.
Installing the Curtain Rail
Knall Curtain Rail
- Convenience of use: Remote control via remote or app, easy opening and closing of curtains.
- Aesthetics and modernity: Hidden mechanisms and discreet design of the curtain rail add elegance to the interior.
- Precise settings: Ability to precisely adjust the position of the curtains, perfect for precise control of light and privacy.
- Quiet operation: Modern motors ensure quiet operation, providing comfort in daily use.
- Integration with smart home systems: Can be connected with smart home systems, allowing for automation and remote control.
Technical Specifications
Door mosquito net
Door mosquito net installation
FAKRO internal roof blinds
Internal Roof Blind ARP
The installation of the FAKRO ARP blind is extremely simple. The set includes all necessary brackets, which are mounted on the window frame, and then the blind is slid into the guides and locked in place. This process takes just a few minutes.
Installation instructions available for download in electronic version:
ARP
Internal Roof Blind ARF
The installation of the FAKRO ARF blind is simple and intuitive. The product is equipped with guides that are mounted on the window frame, and then the blind is inserted and locked in place. It’s a quick and easy process.
Installation instructions available for download in electronic version:
ARF
ARF Z-Wave
Internal Roof Blind AJP
The installation of the FAKRO AJP blind is easy and quick. The guides are mounted to the window frame, then the blind is inserted and secured at the ends. This simple process requires no special tools, making it ideal for DIY installation.
Installation instructions available for download in electronic version:
AJP
AJP Z-Wave
Internal Pleated Roof Blind APS
The installation of the FAKRO APS blind is extremely quick and easy. The guides are mounted to the window frame, then the blind is inserted and locked in place. Thanks to precise fitting, the installation takes only a few minutes, offering an aesthetic and functional result.
Installation instructions available for download in electronic version:
APS
FAKRO external roof blinds
External Roof Awning AMZ
Installation instructions available for download in electronic version:
AMZ
AMZ NewLine
AMZ Z-Wave
AMZ Solar
External Roof Blind ARZ
Installation instructions available for download in electronic version:
ARZ-H
ARZ Z-Wave
ARZ Solar